
Scheduling Settings & Interview Links
Overview
Discovered’s scheduling tools allow recruiters and hiring teams to automate interview scheduling, reduce back-and-forth communication, and create a smoother candidate experience.
Because Discovered is currently transitioning to a redesigned scheduling system, your account may see either:
- The Classic Scheduling Settings experience
- The New Scheduling Settings & Interview Links experience
This article covers both versions so you can quickly find the instructions relevant to your account.
The scheduling system helps teams:
- Sync calendars with Google or Microsoft
- Share interview scheduling links with candidates
- Automatically schedule interviews
- Send reminders and confirmations
- Reduce no-shows
- Coordinate interviews across hiring teams
- Manage one-on-one and group interviews
If you use Calendly as the scheduling provider, configure the meeting location or Zoom link inside the Calendly event. If you use a Discovered-generated scheduling link, configure the meeting location in Discovered.
Which Scheduling Version Am I Using?
You Are Using the Classic Scheduling System If:
- You manage scheduling primarily from your user profile
- You only have a single scheduling link
- You do not see sections like:
- Scheduling Links
- Manage Interviews
- Access Control
- Manage Calendars
You Are Using the New Scheduling System If:
- You see a dedicated Scheduling Settings page
- You can create multiple scheduling links
- You can configure interview reminders
- You see sections such as:
- General Settings
- Scheduling Links
- Manage Interviews
- Access Control
- Integrations
- Manage Calendars
Before Using a Hiring Manager’s Scheduling Link
The hiring manager must have their calendar connected to Discovered before using a Discovered-generated Scheduling Link.
If a user becomes the Job Posting Owner but has not connected their calendar, the Default Scheduling Link token may appear blank when the message is sent to the candidate.
For this reason, changing the Job Posting Owner is not required simply to send another user’s scheduling link. Instead, select that user’s specific Scheduling Link token in the message or sequence.
Classic Scheduling Settings
Overview
The Classic Scheduling System allows users to connect their calendar and share a scheduling link with candidates for interview booking.
This version supports:
- Google and Microsoft calendar integration
- Basic availability management
- Scheduling link sharing
- Automated calendar syncing
Setting Up Classic Scheduling:
1. Connect Your Calendar
Navigate to:
Profile Settings → Calendar Settings
Connect either:
- Google Calendar
- Microsoft Calendar
Once connected, Discovered can:
- Detect your availability
- Create interview events
- Sync scheduled meetings automatically
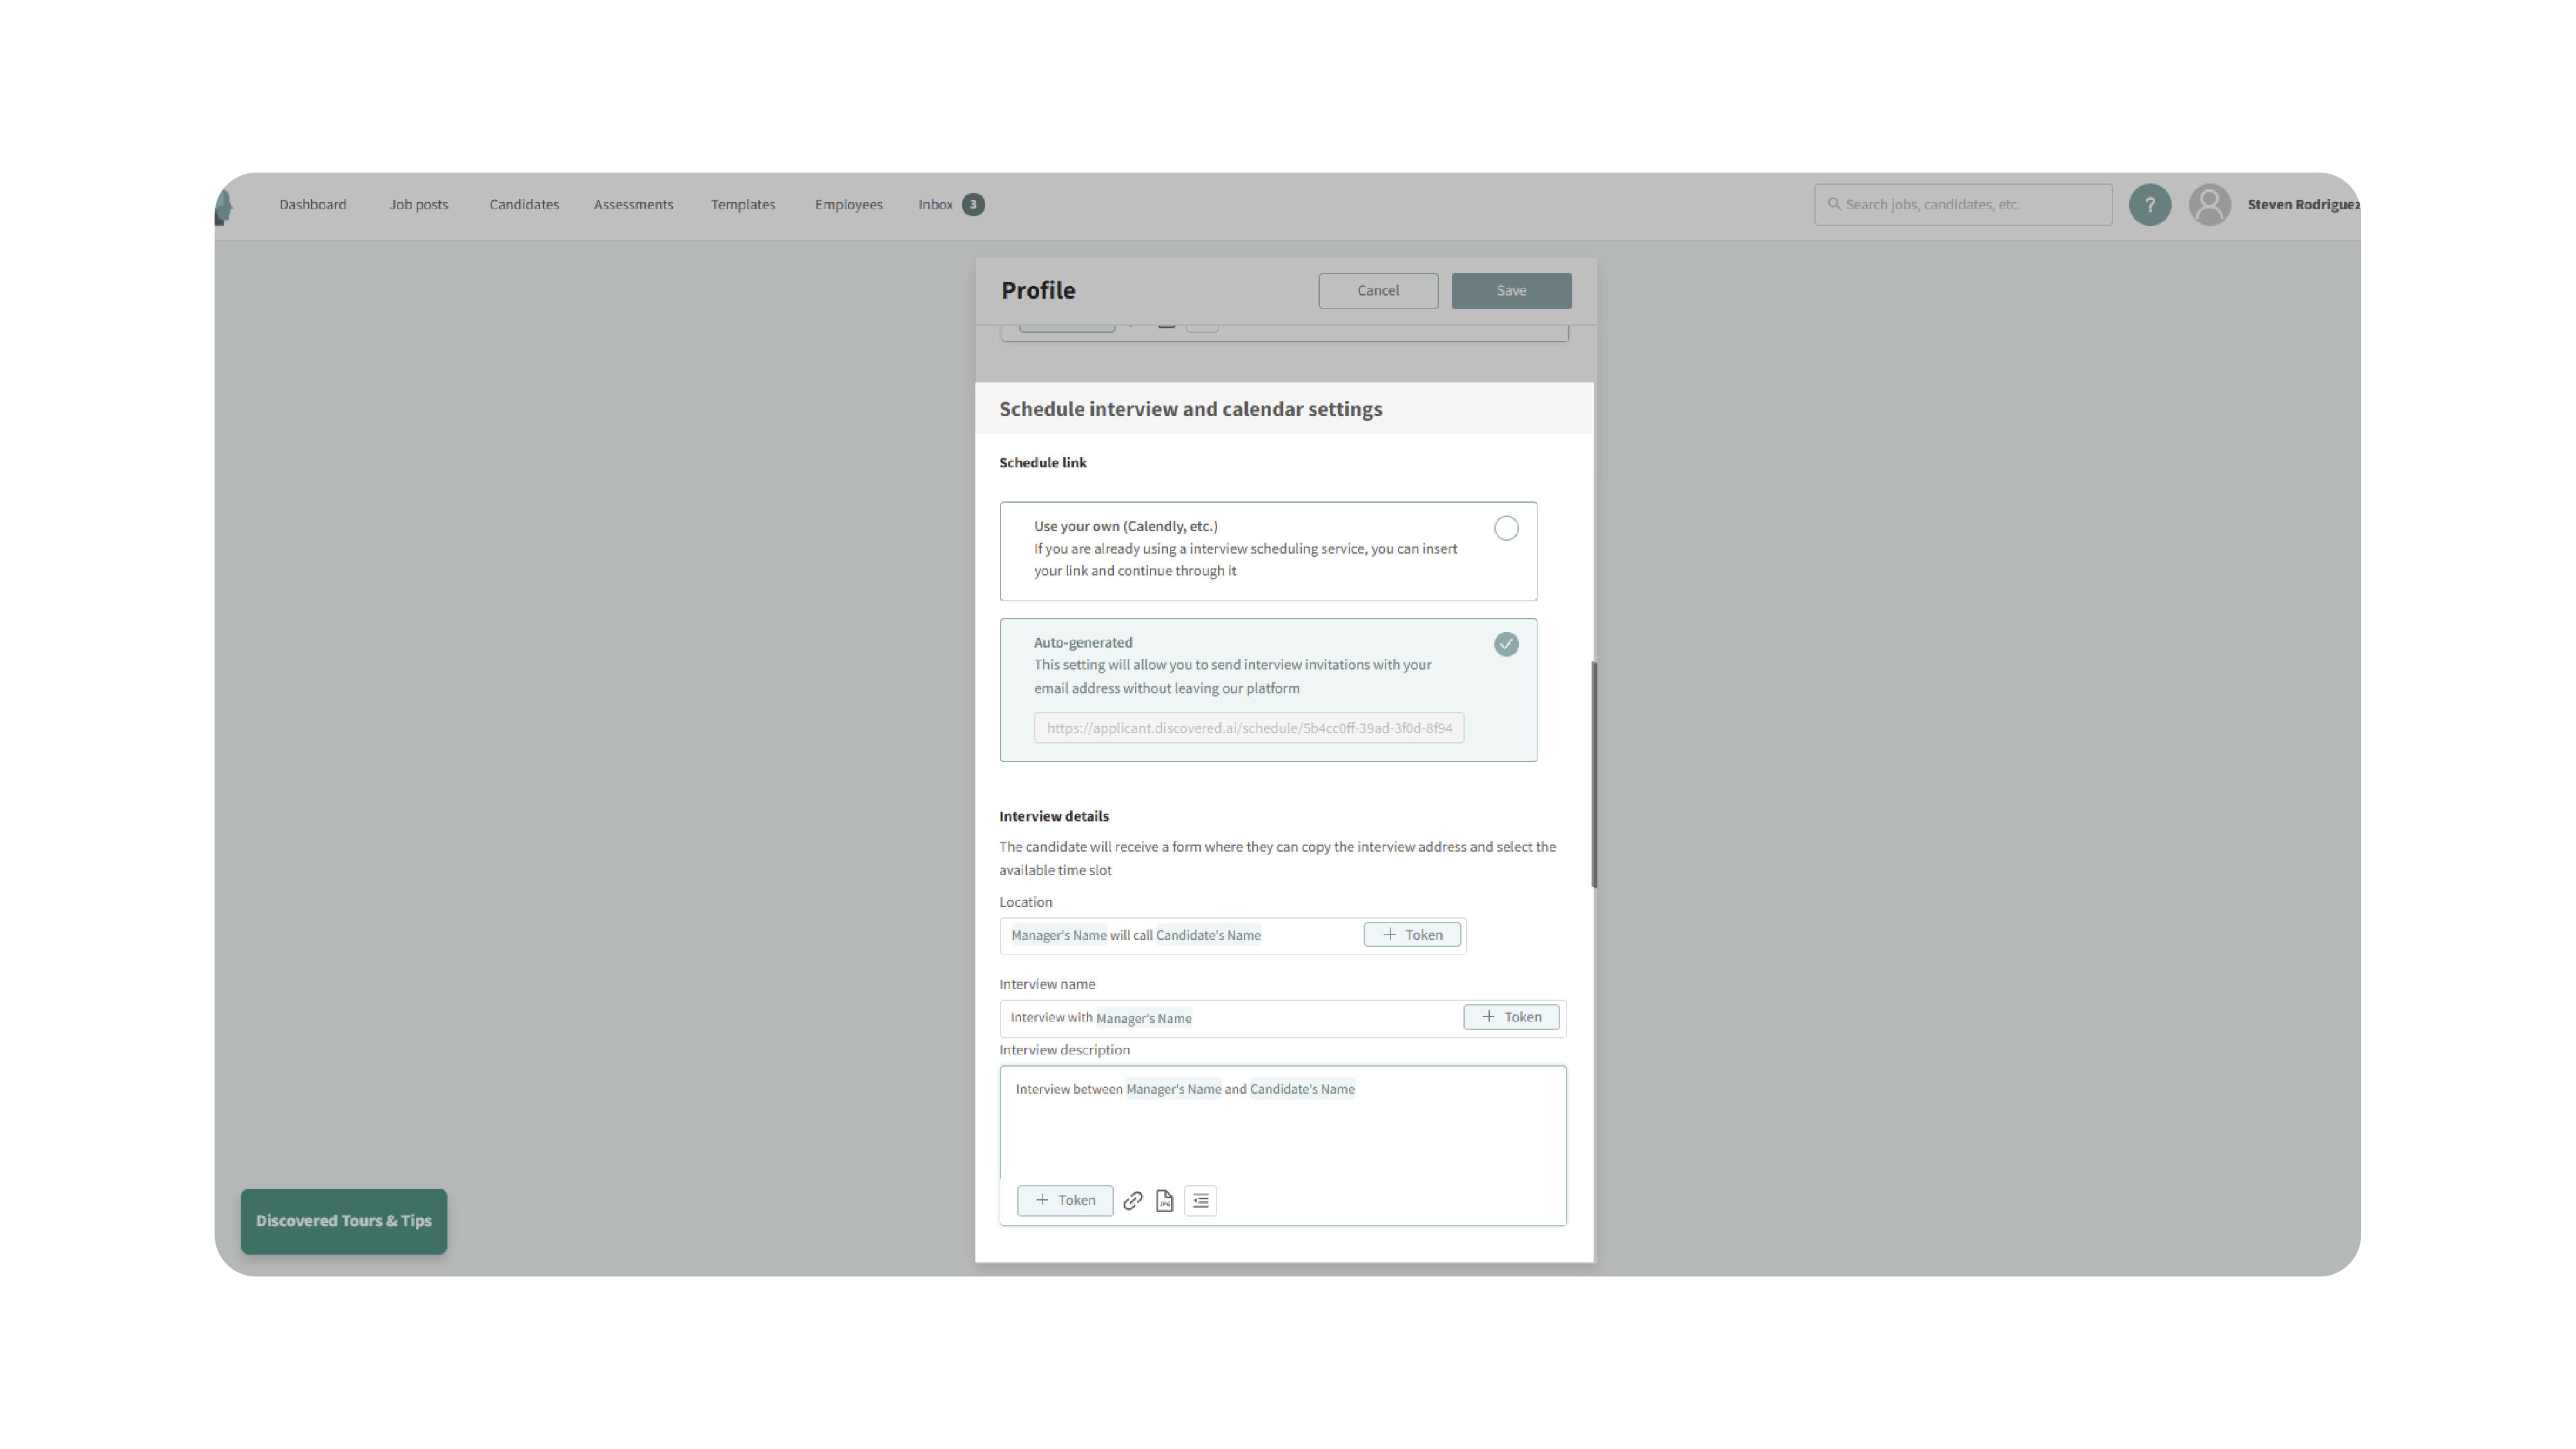
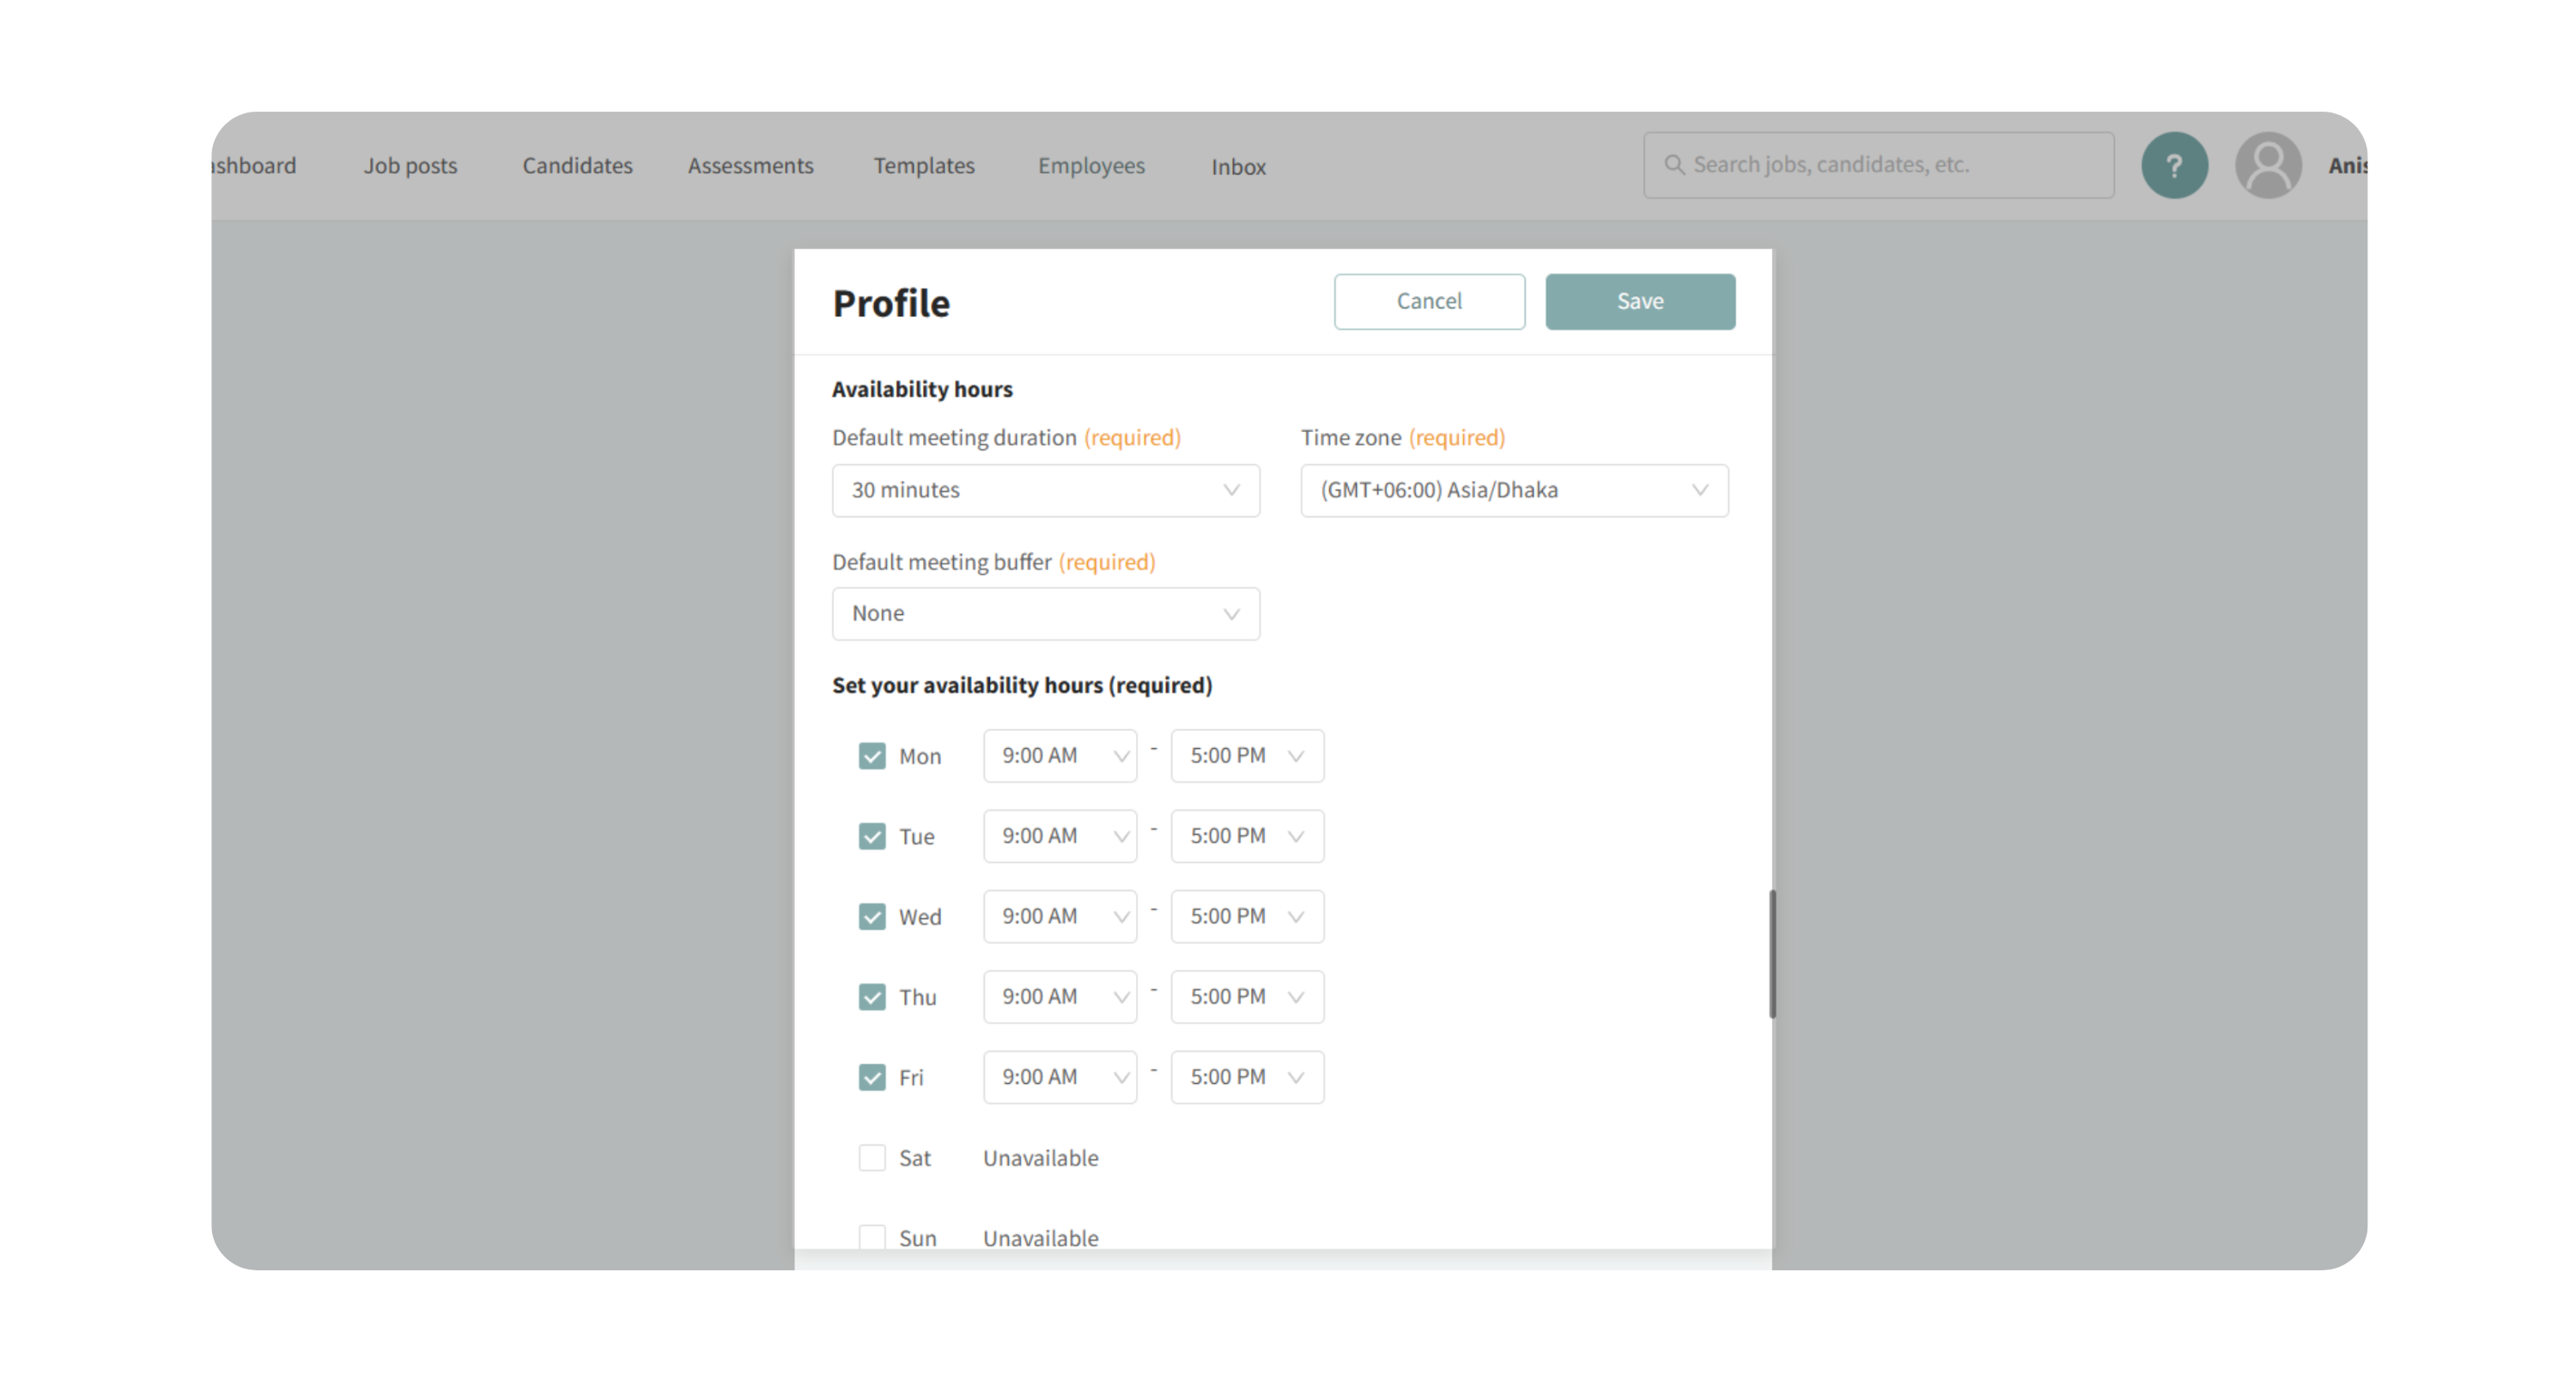
2. Configure Availability
Set:
- Available interview hours
- Time zone preferences
- Meeting buffers between interviews
This controls when candidates can schedule meetings with you.
3. Share Your Scheduling Link
Once configured, your scheduling link can be:
- Sent manually to candidates
- Used in automations and templates
- Added to interview workflow messages
Candidates can select available times directly from your calendar.

4. Candidate Scheduling Experience
When candidates open the link:
- They see your available time slots
- They choose a meeting time
- The meeting is automatically added to your calendar
Discovered automatically syncs the scheduled interview with the candidate profile.

New Scheduling Settings & Interview Links
Overview
The redesigned Scheduling Settings system centralizes all interview scheduling tools into a single workspace with significantly more flexibility and automation.
This version includes:
- Multiple scheduling links
- One-on-one and group interviews
- Automated reminders
- Teams, and Google Meet integrations
- Shared scheduling visibility
- Team interview management
- Advanced availability controls
- Candidate rescheduling and withdrawal tools
Step-by-Step Setup (New Version)
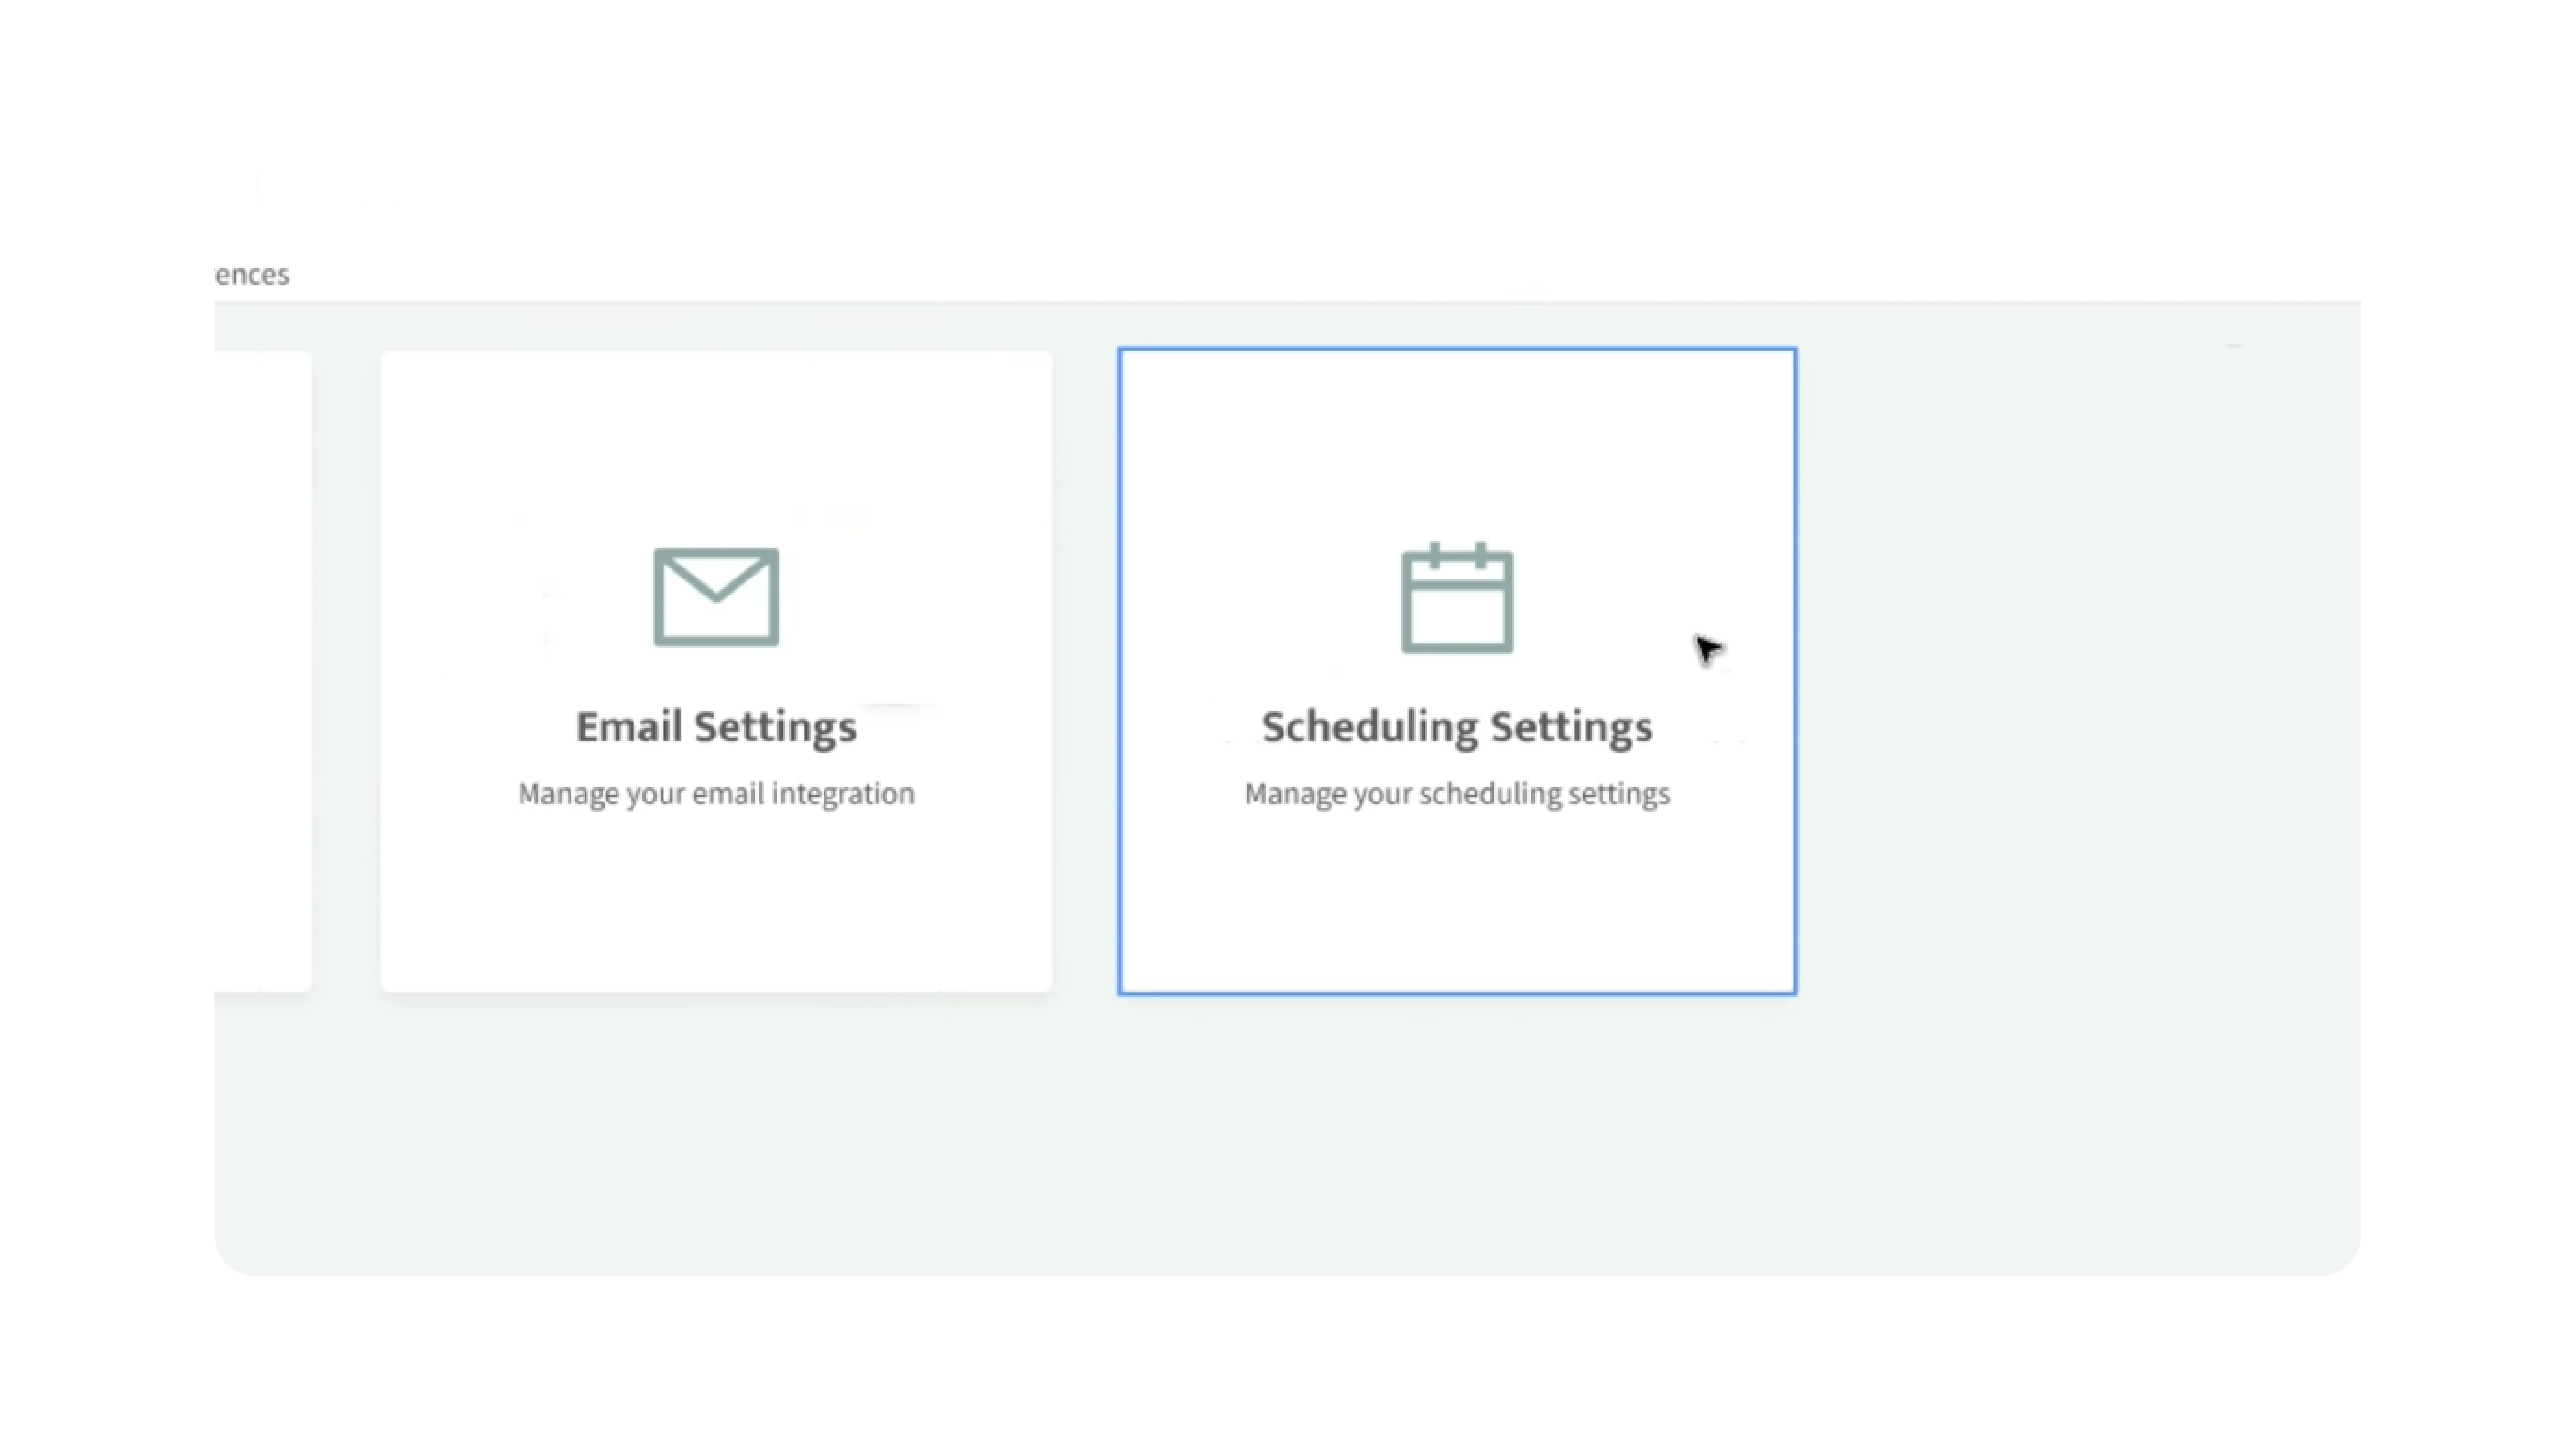
1. Access Scheduling Settings
Navigate to:
Profile Settings → Scheduling Settings
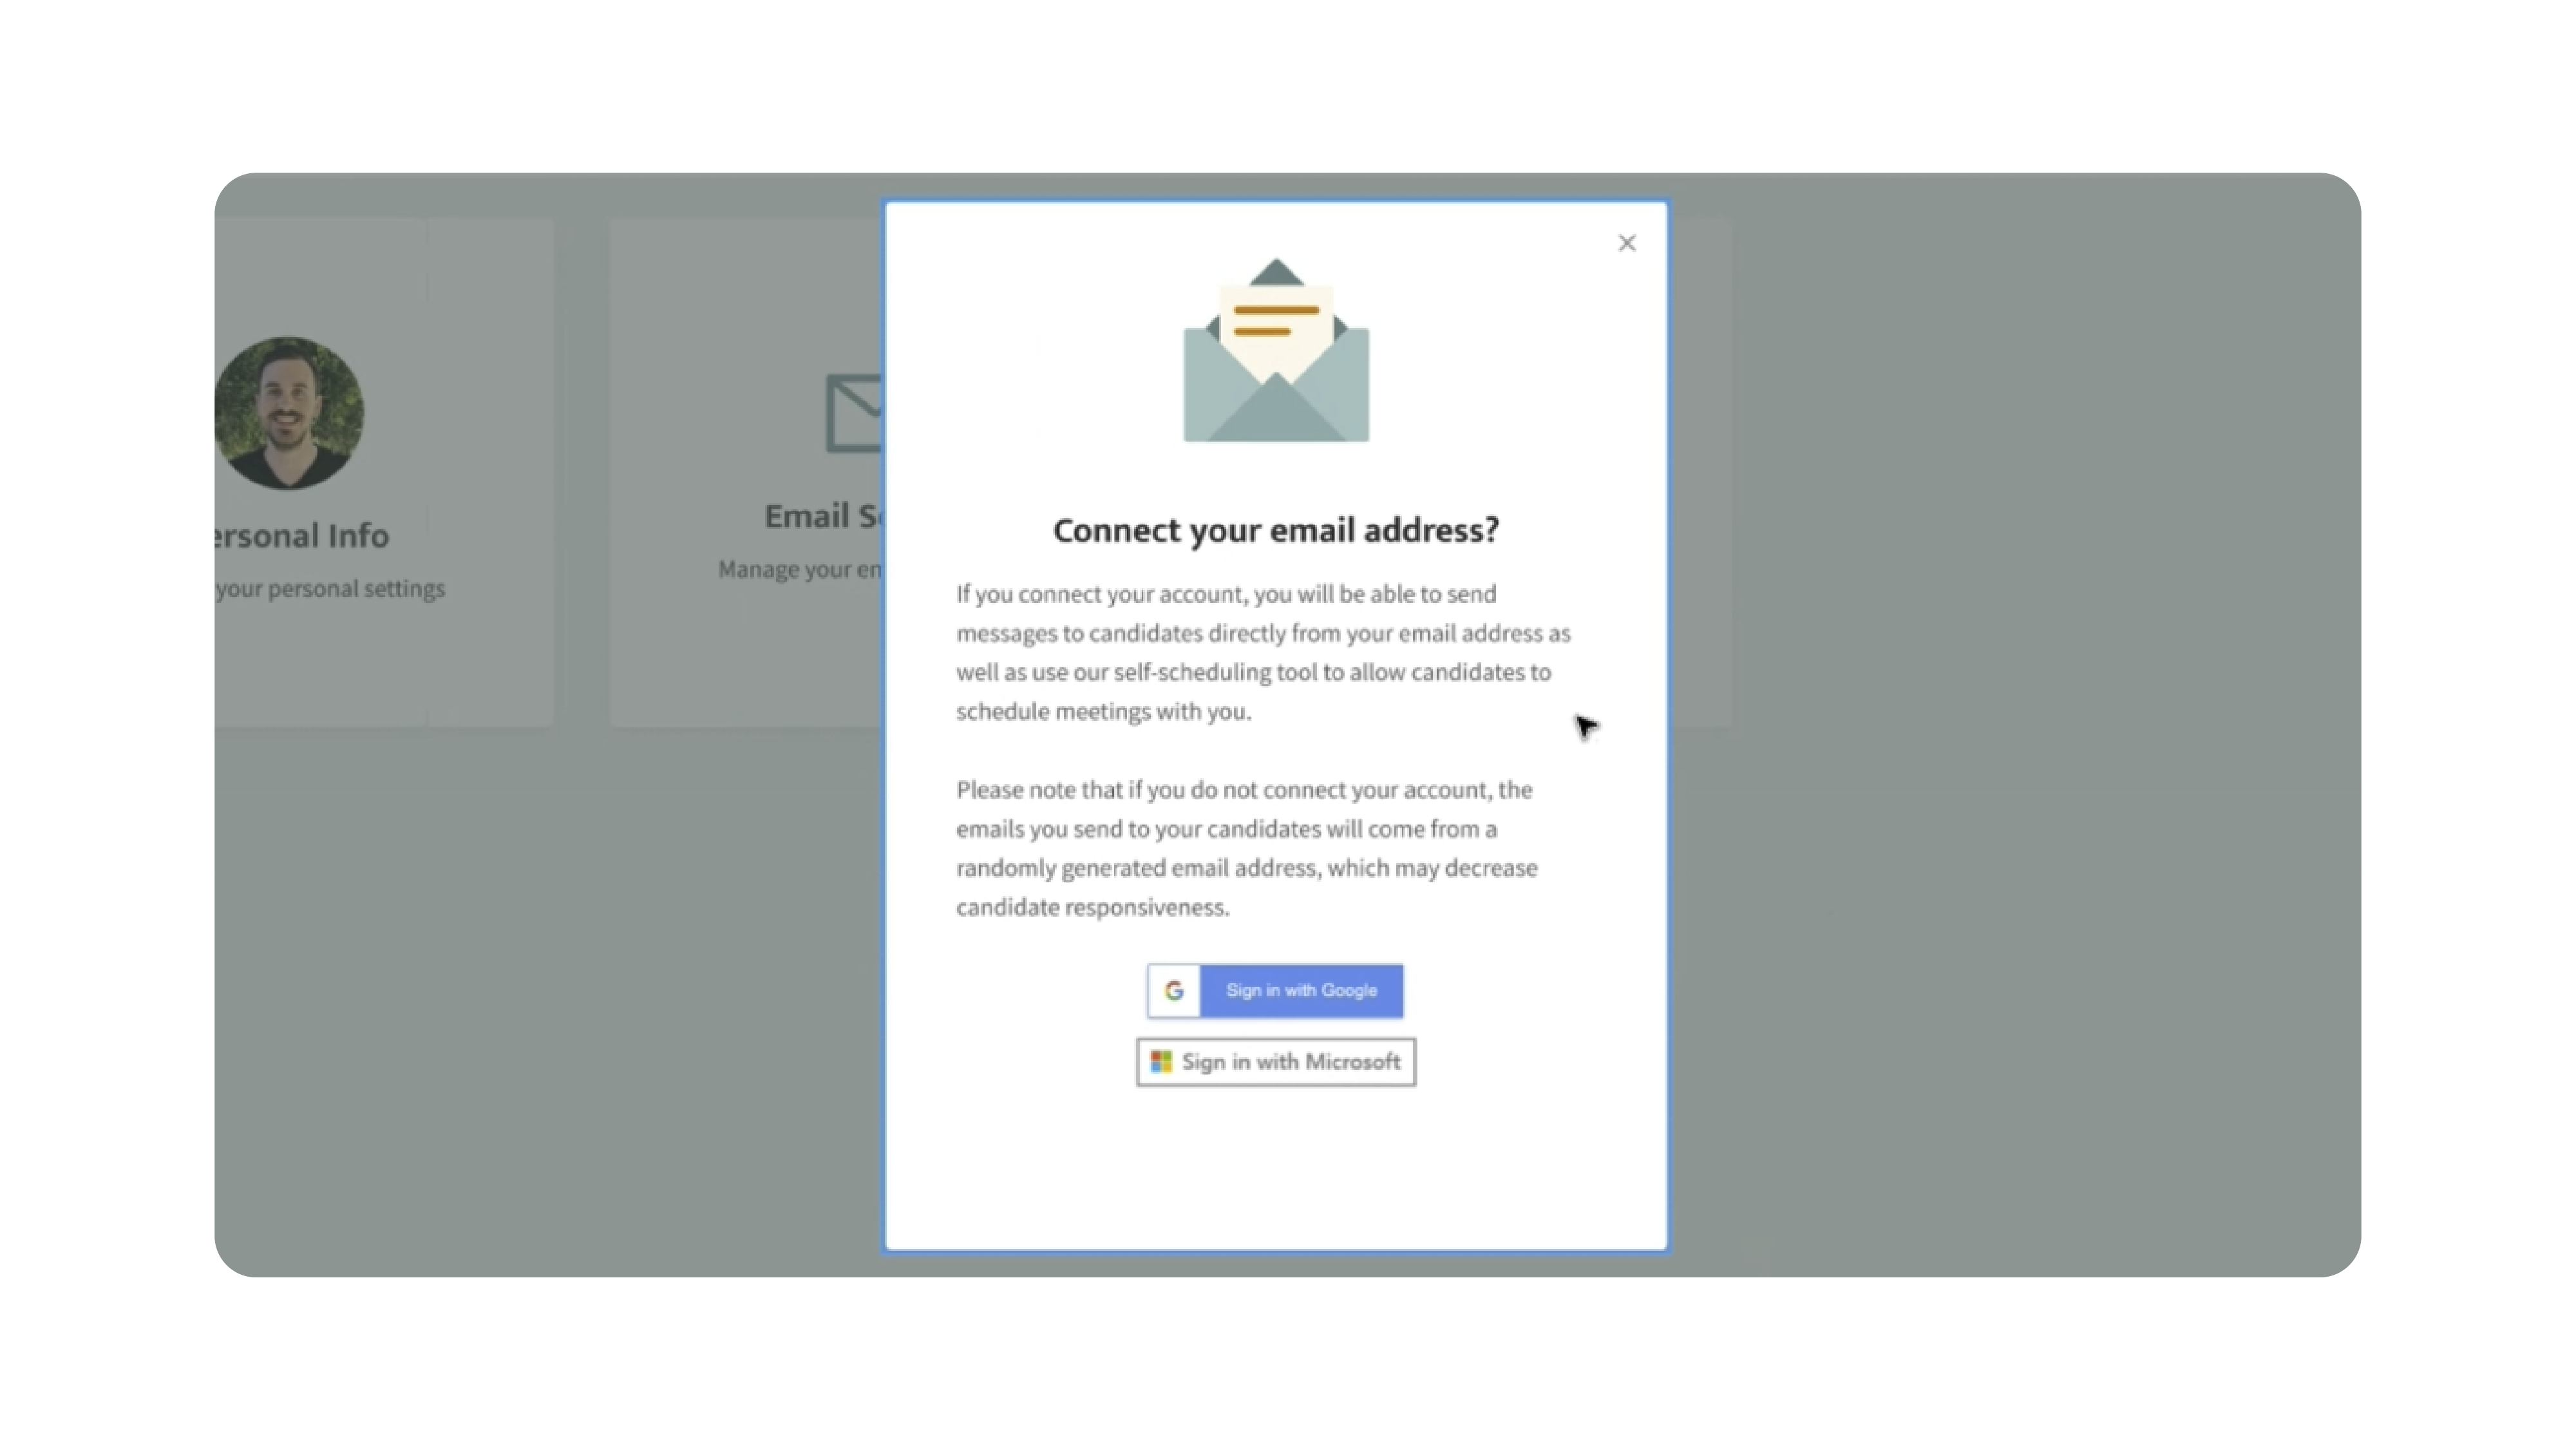
If your email/calendar is not connected yet, you will first be prompted to integrate:
- Microsoft
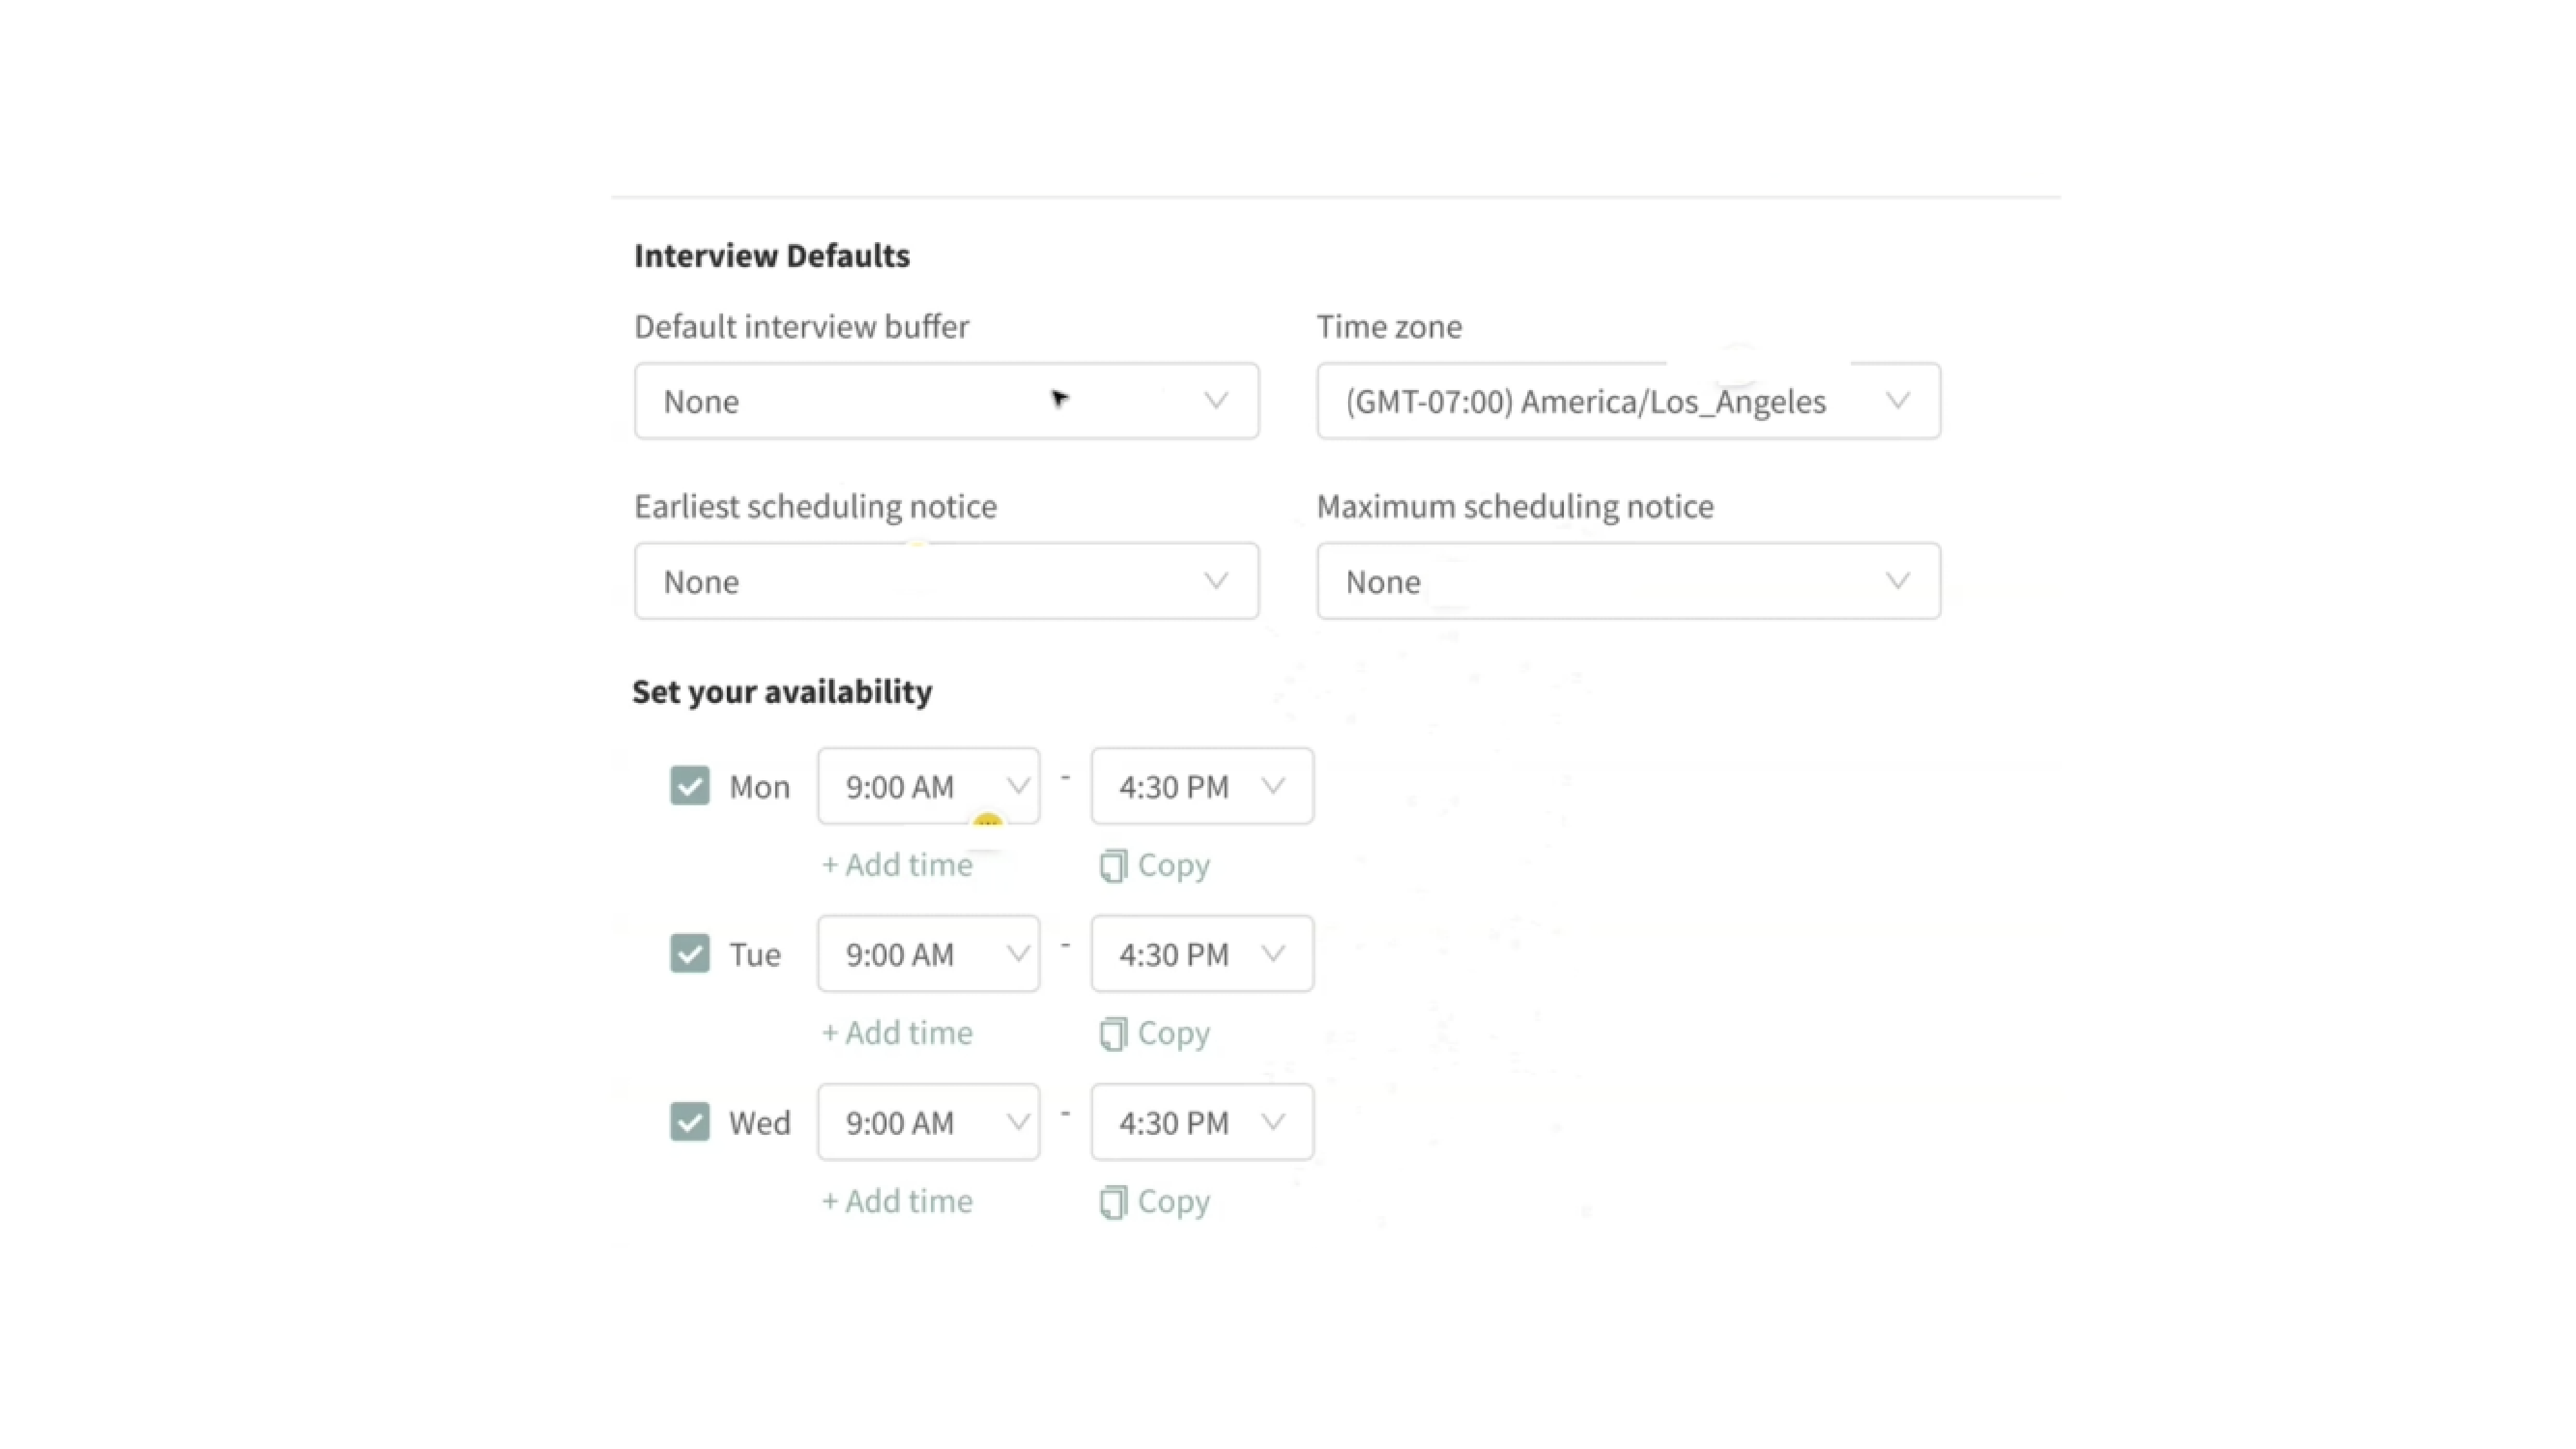
2. Configure General Availability
Inside General Settings, configure:
- Time zone
- Interview buffers
- Earliest scheduling notice
- Maximum booking window
- Weekly availability hours
You can also:
- Create multiple availability windows in one day
- Copy schedules across multiple days
Example:
- 9:00 AM – 12:00 PM
- 1:00 PM – 4:30 PM
3. Create Scheduling Links
Inside Scheduling Links:
- Click Create Scheduling Link
- Select an interview type:
- Phone Interview
- Video Interview
- In-Person Interview
- Group Interview
You can create multiple scheduling links for different recruiting workflows.
Each link can include:
- Meeting duration
- Interview location
- Guests/interviewers
- Interview descriptions
- Calendar integrations
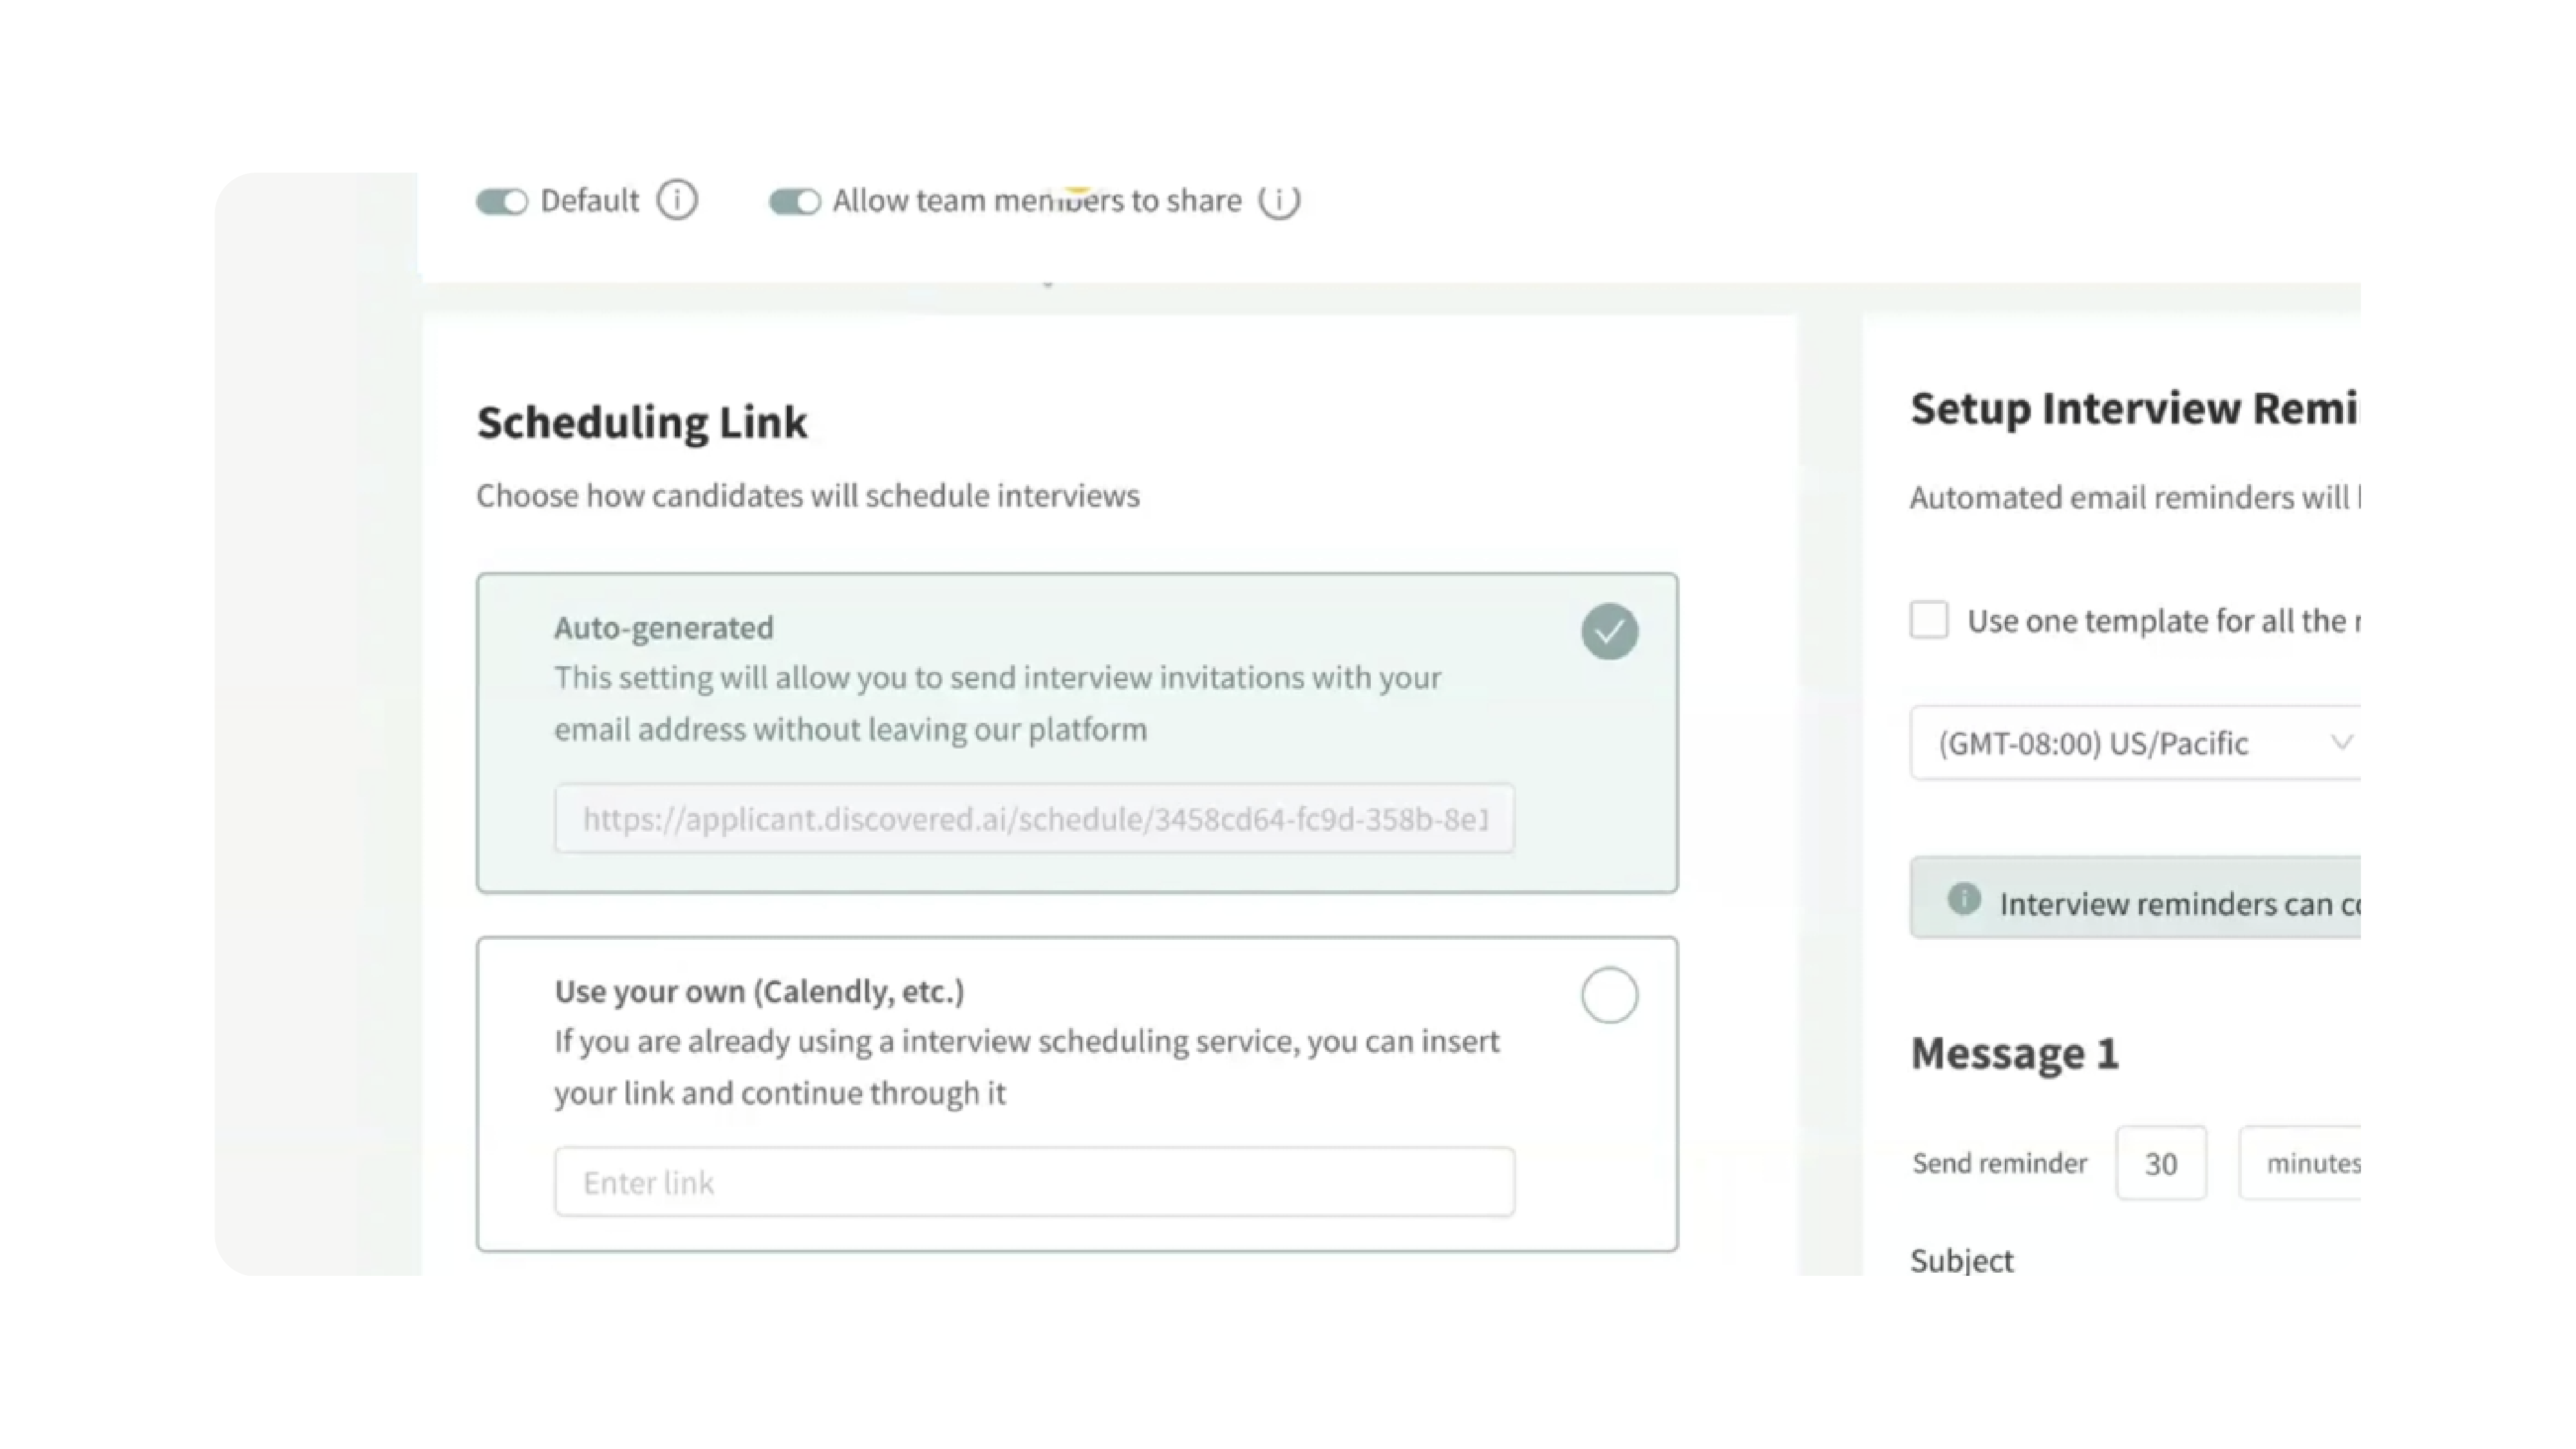
Also you can allow team members to share scheduling links.
4. Add Interview Guests
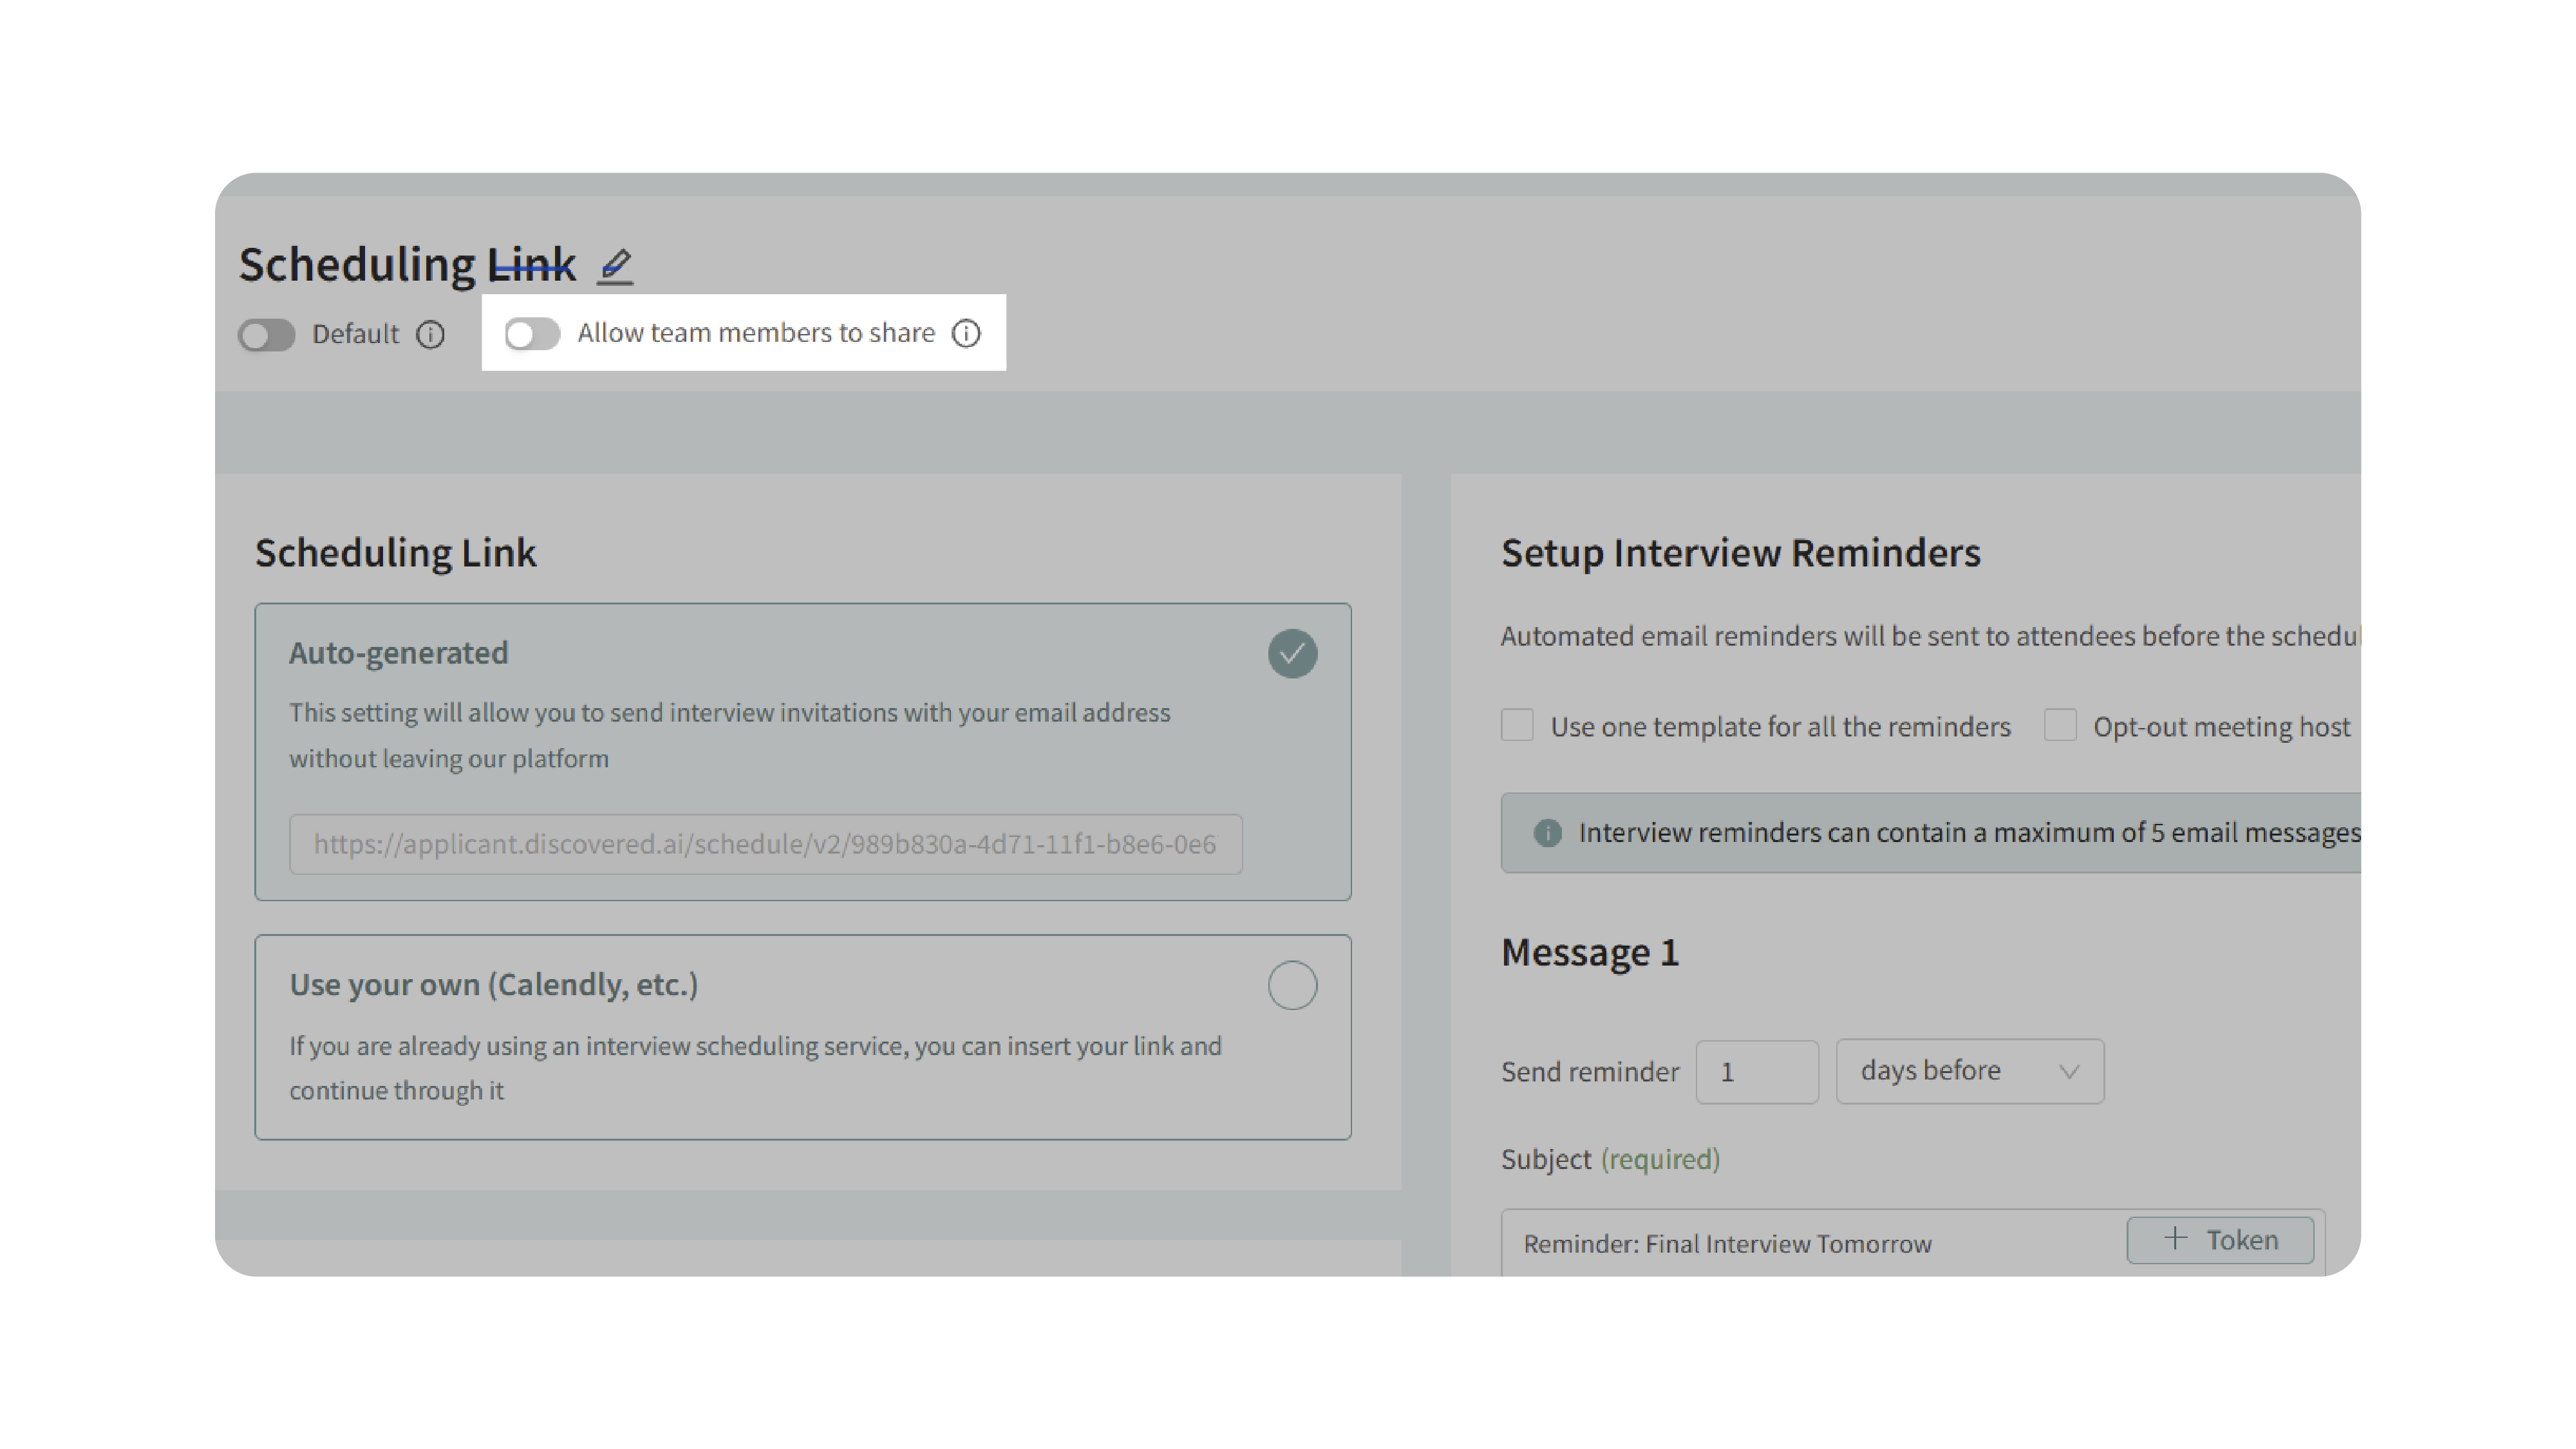
If you need to schedule more than one interviewer, you just have to add them in the "Guests" field.
Once your Scheduling Link has been generated, you can select the interview type, video platform, location, and the guests in the Interview details section.
You can find it when you add a scheduling link token while creating a message:
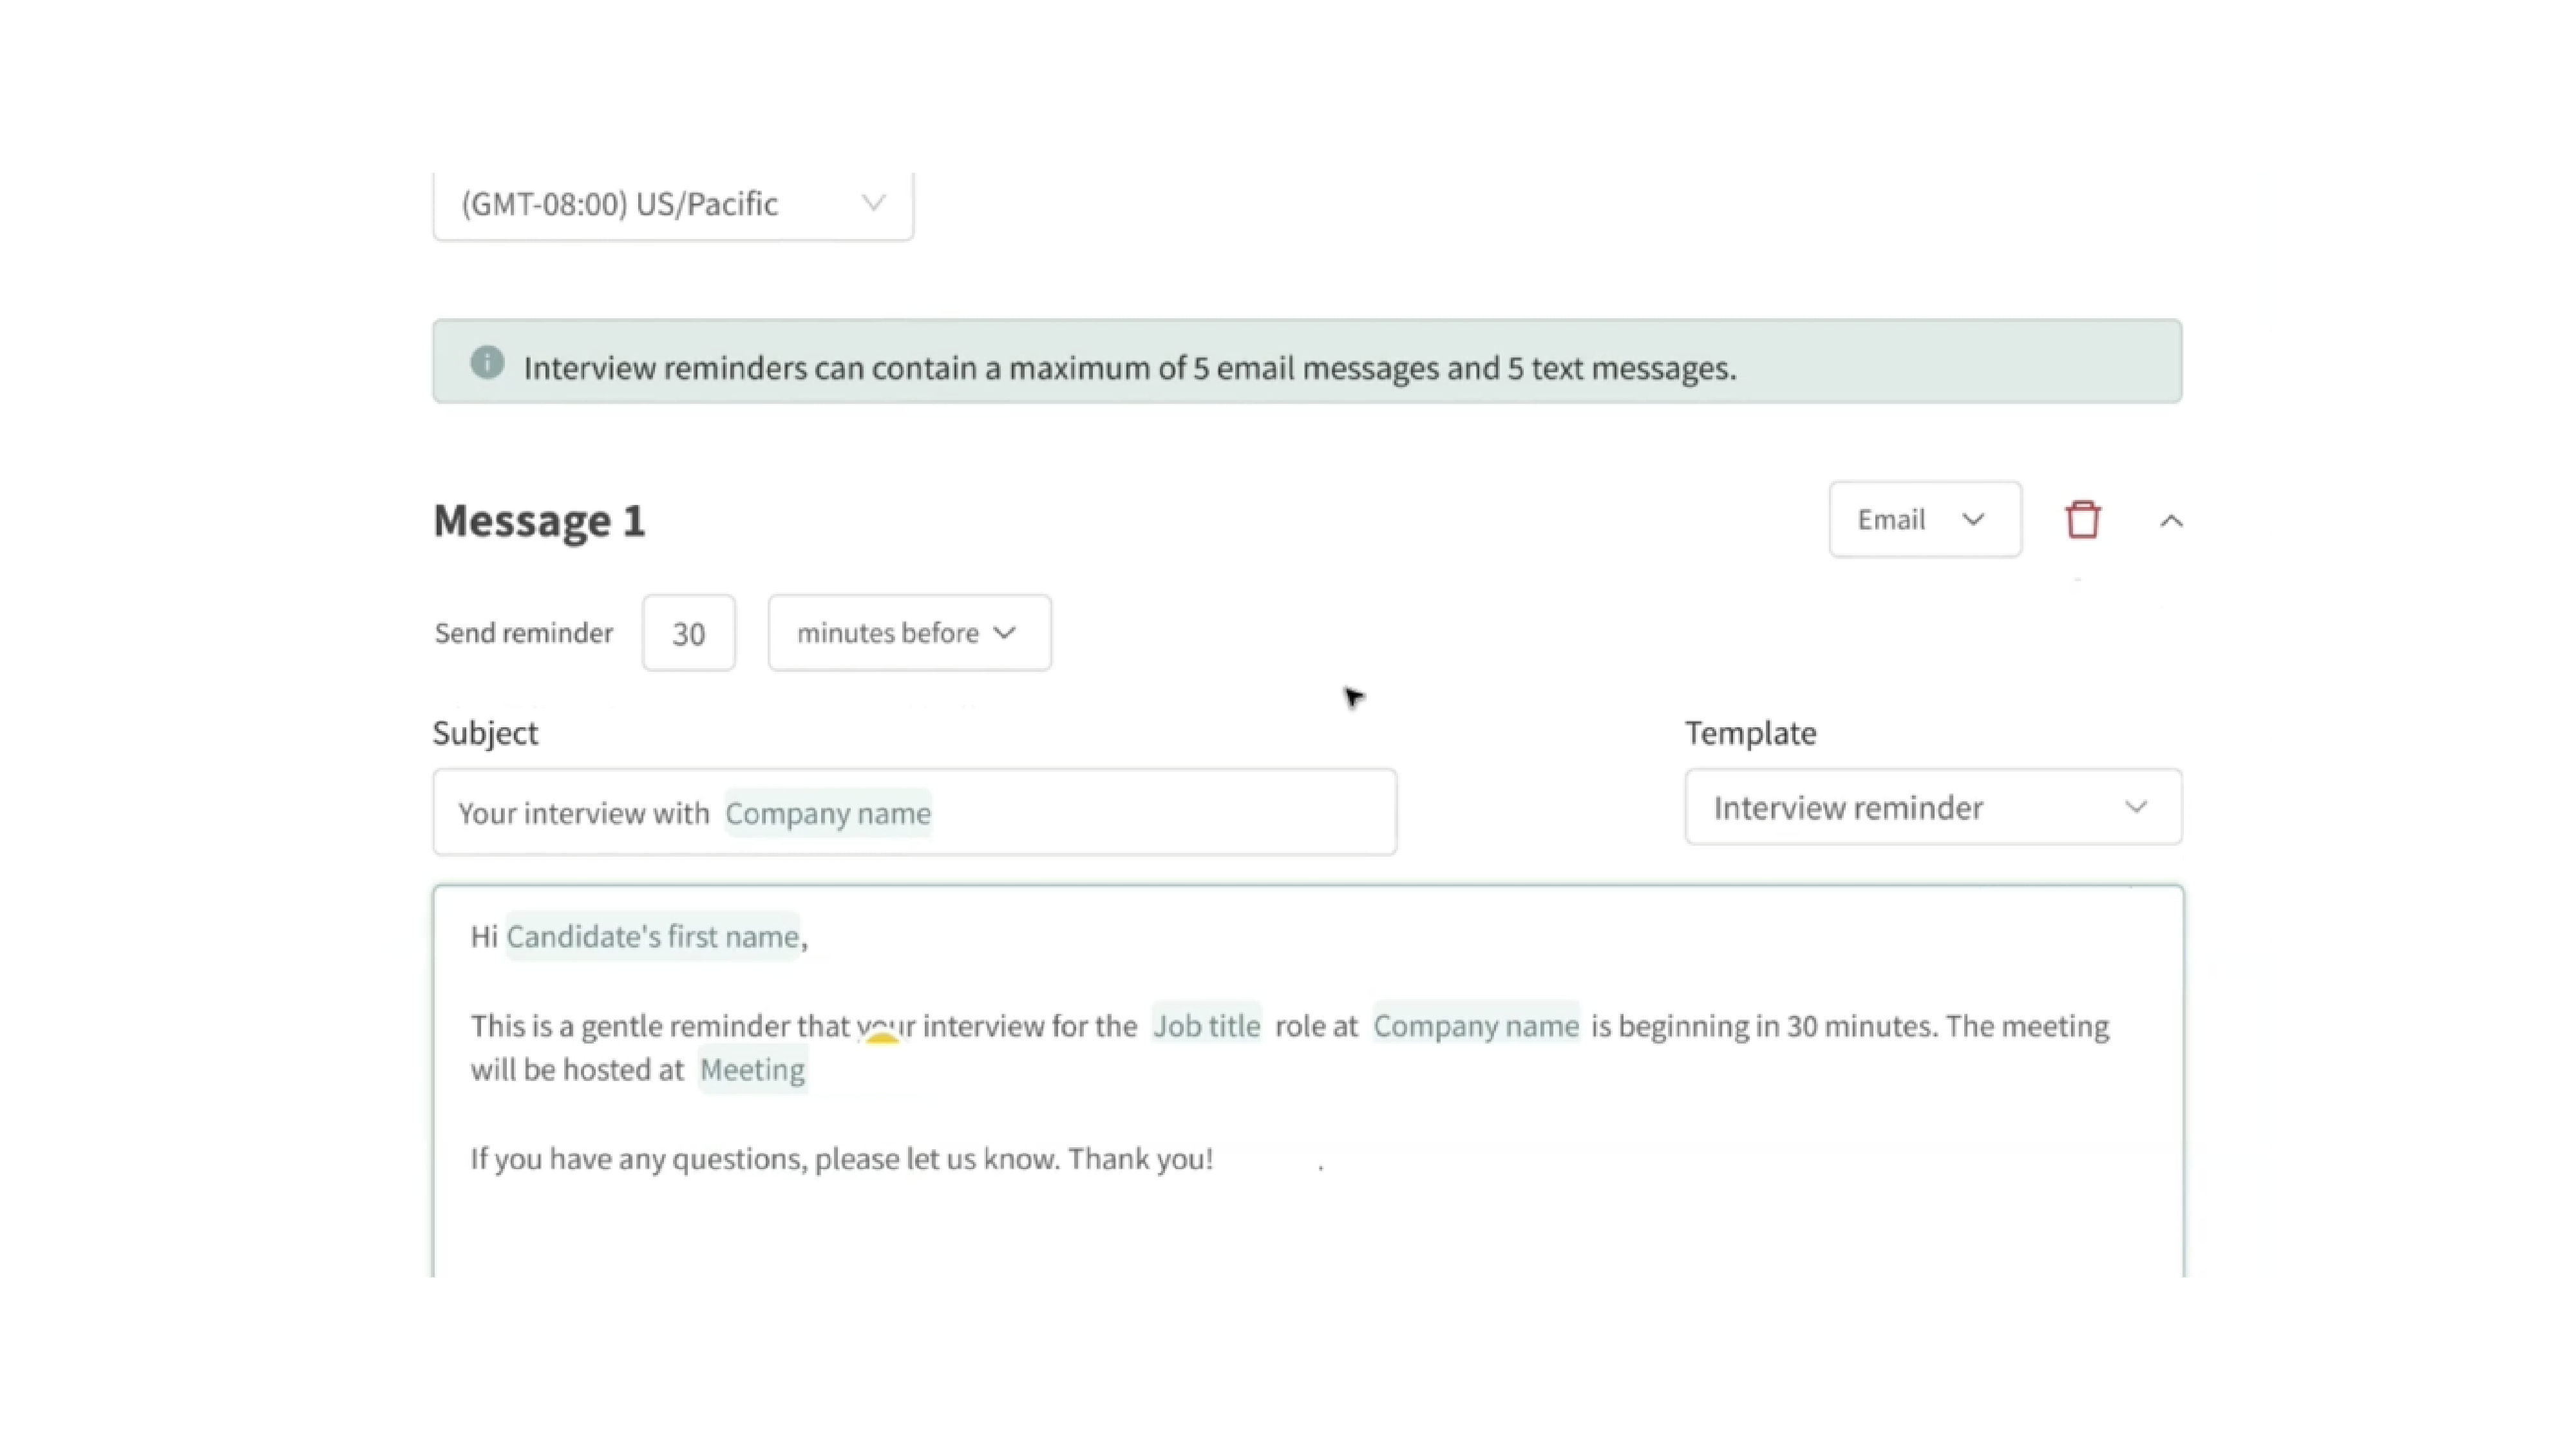
5. Configure Interview Reminders
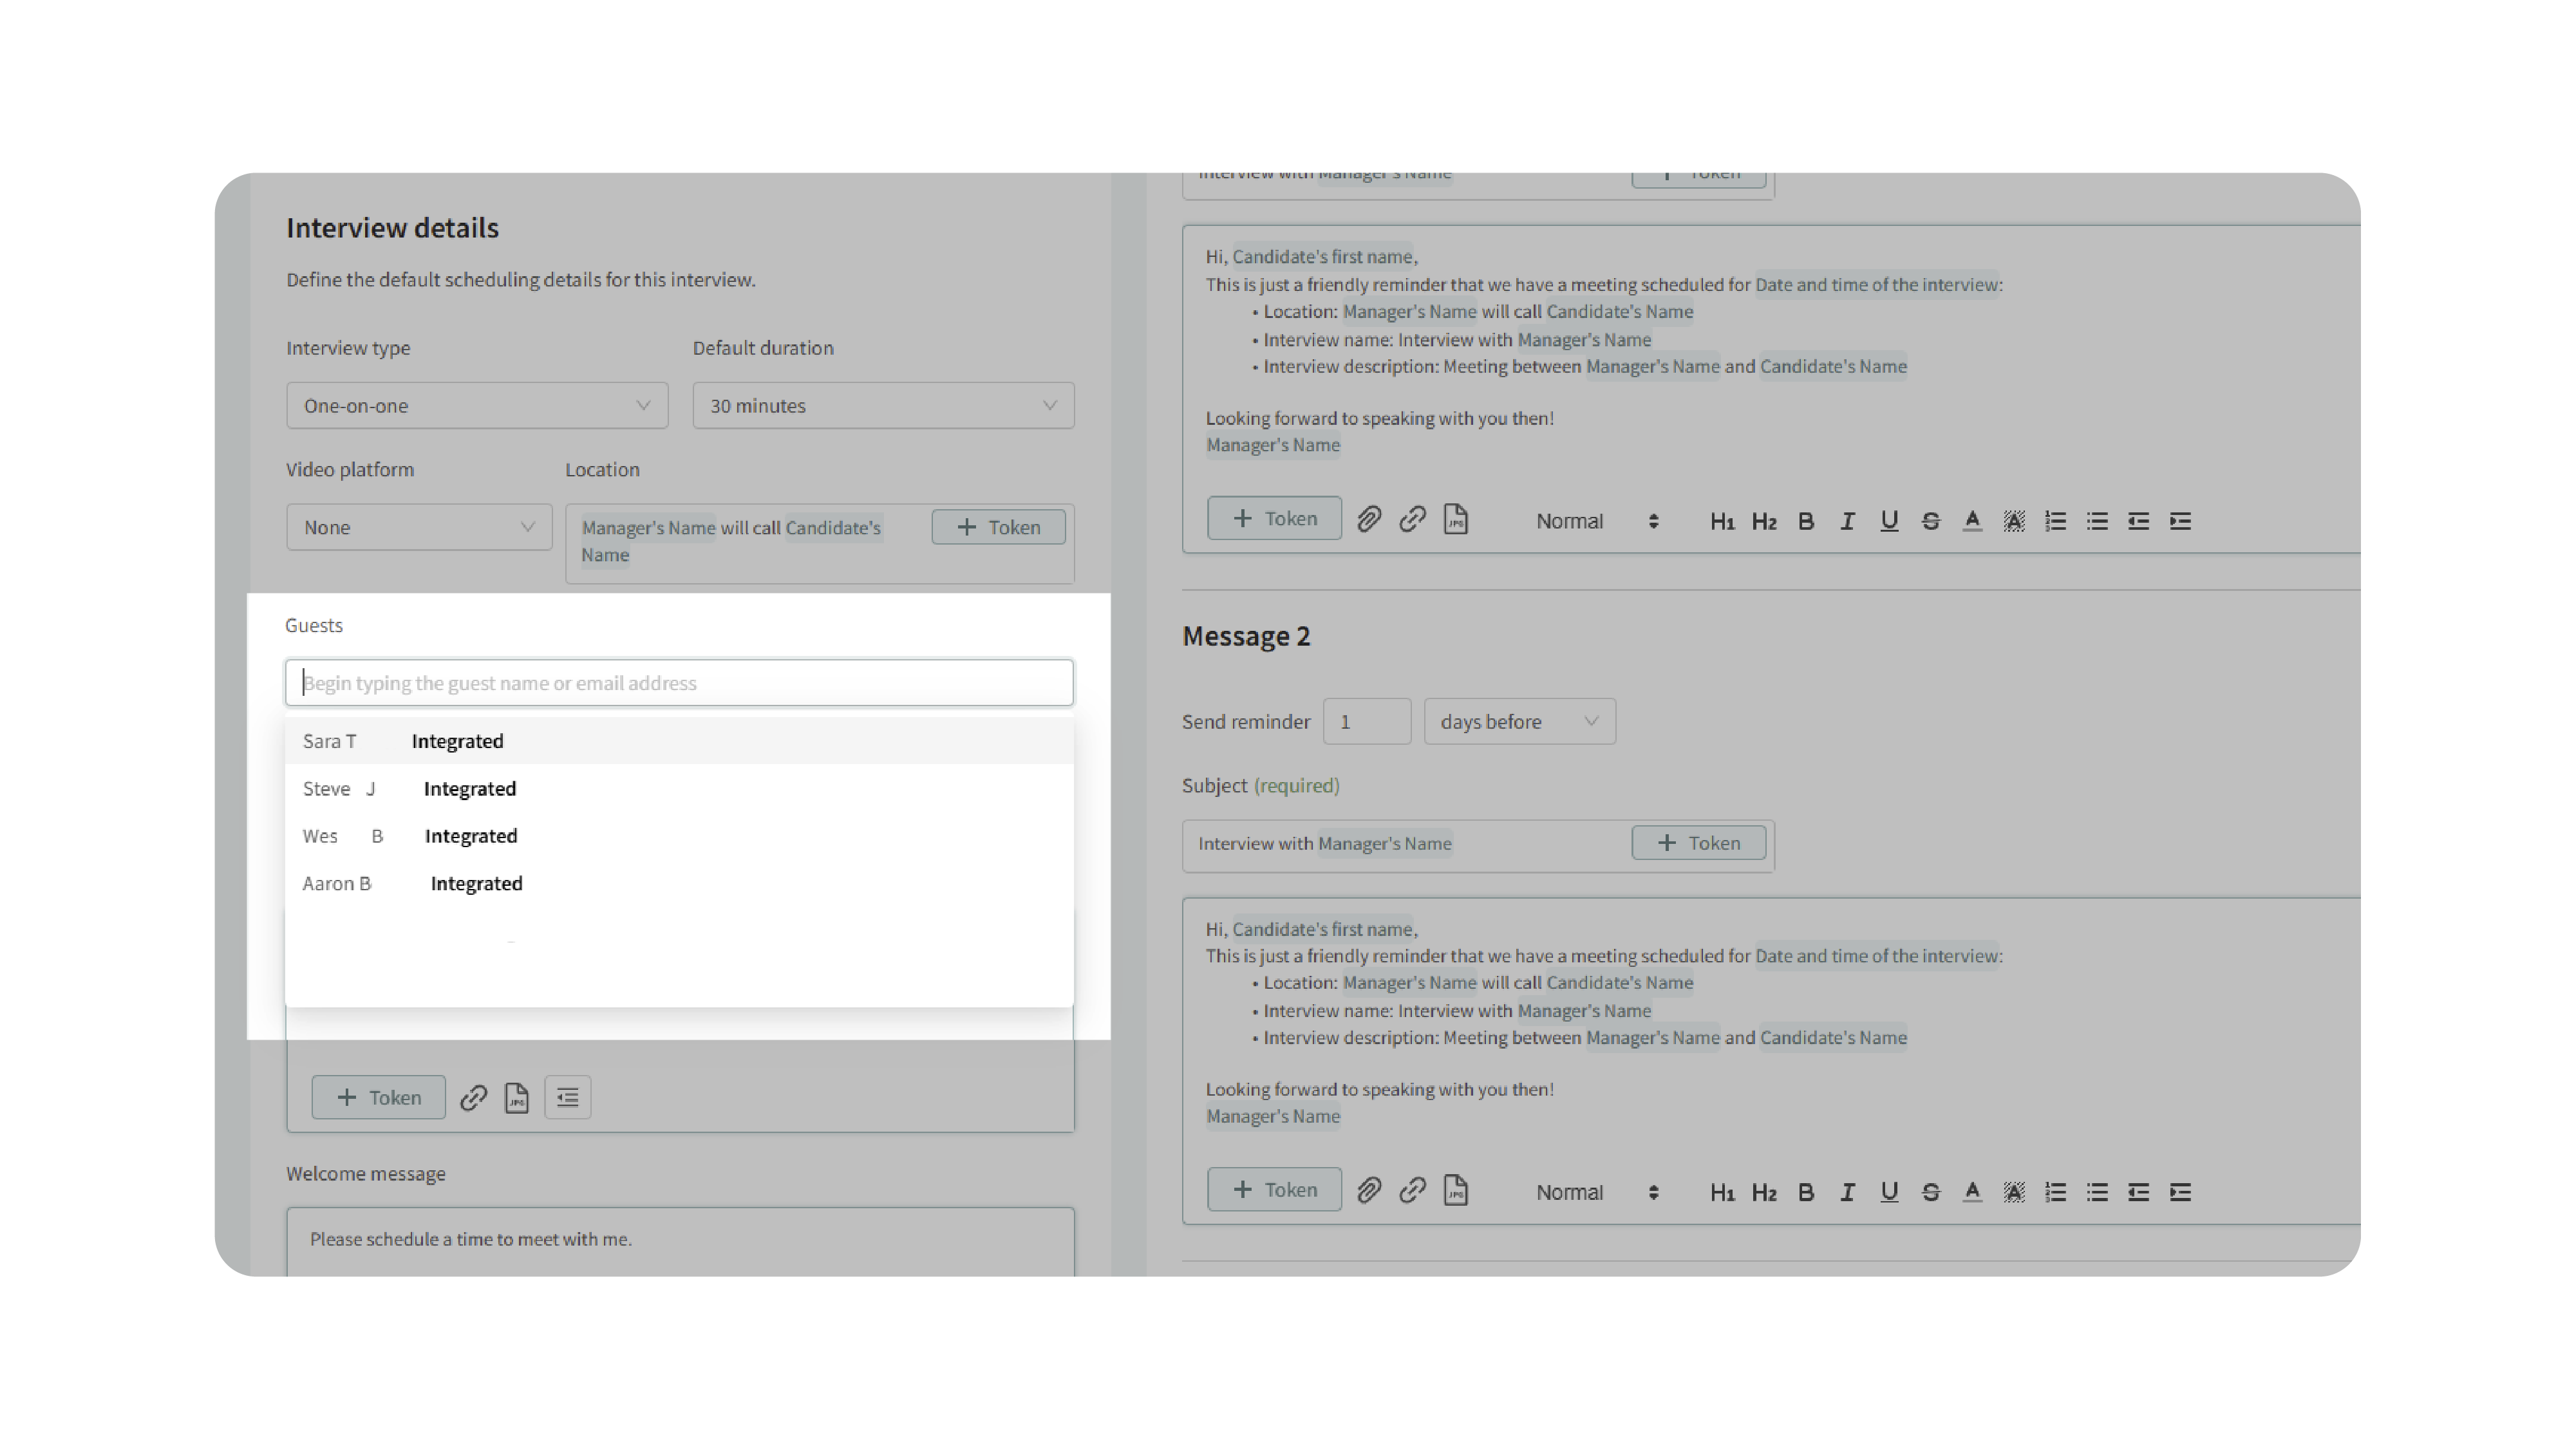
The new scheduling system supports automated reminders via:
- SMS
You can configure reminders:
- Minutes before interviews
- Hours before interviews
- Days before interviews
- Weeks before interviews
Reminders automatically update if interviews are rescheduled.
6. Add a Scheduling Link to a Sequence (Optional)
- Open a sequence, automation message, or scheduling communication
- Inside the message editor, click + Token
- Expand the Scheduling Links section
- Select the scheduling link you want to insert into the message
The selected scheduling link will automatically be embedded into the message sent to candidates.
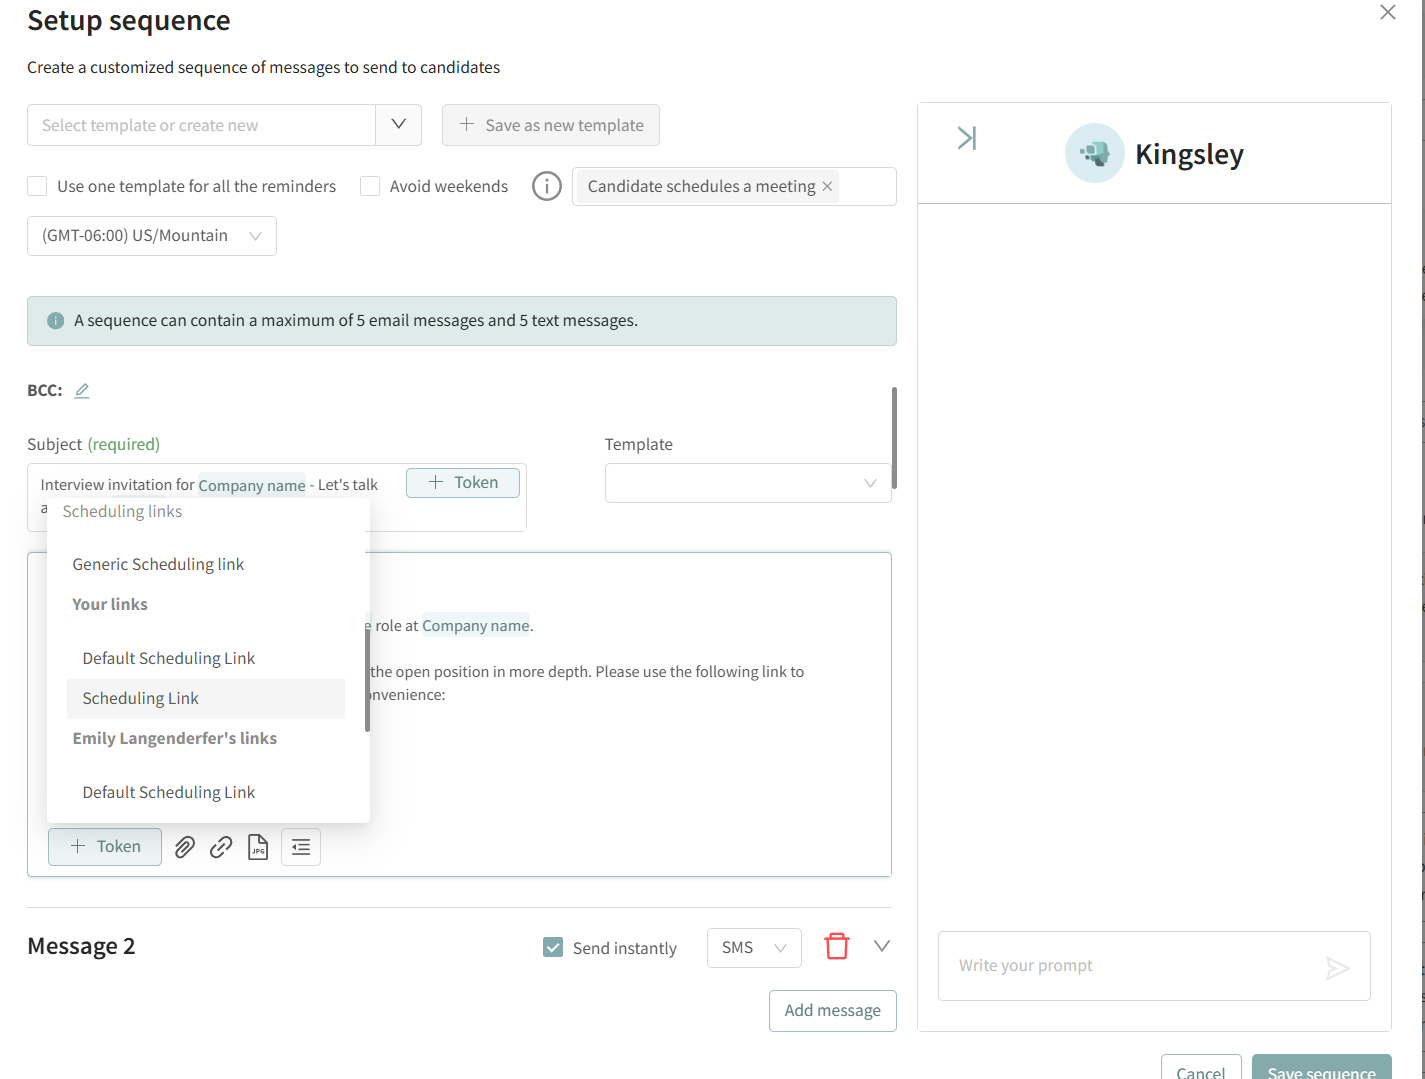
Note: Shared scheduling links only appear if another user has enabled visibility sharing for their scheduling links. Users must be on the new scheduling system to access this feature. If no shared links appear, it may mean no other users have granted access to their scheduling links yet.
7. Connect Meeting Platforms
Under Integrations, connect:
- Microsoft Teams: If the hiring manager wants candidates to receive a Microsoft Teams meeting link, configure Microsoft Teams as part of that hiring manager’s Scheduling Link. Once the Scheduling Link is configured with the appropriate meeting details, insert that specific Scheduling Link token into the email, sequence, or Processing automation.
You do not need to paste the Microsoft Teams URL manually into every email template.
- Google Meet
Once connected, Discovered can automatically generate:
- Meeting links
- Join instructions
- Video conference details
These are inserted directly into interview invitations.
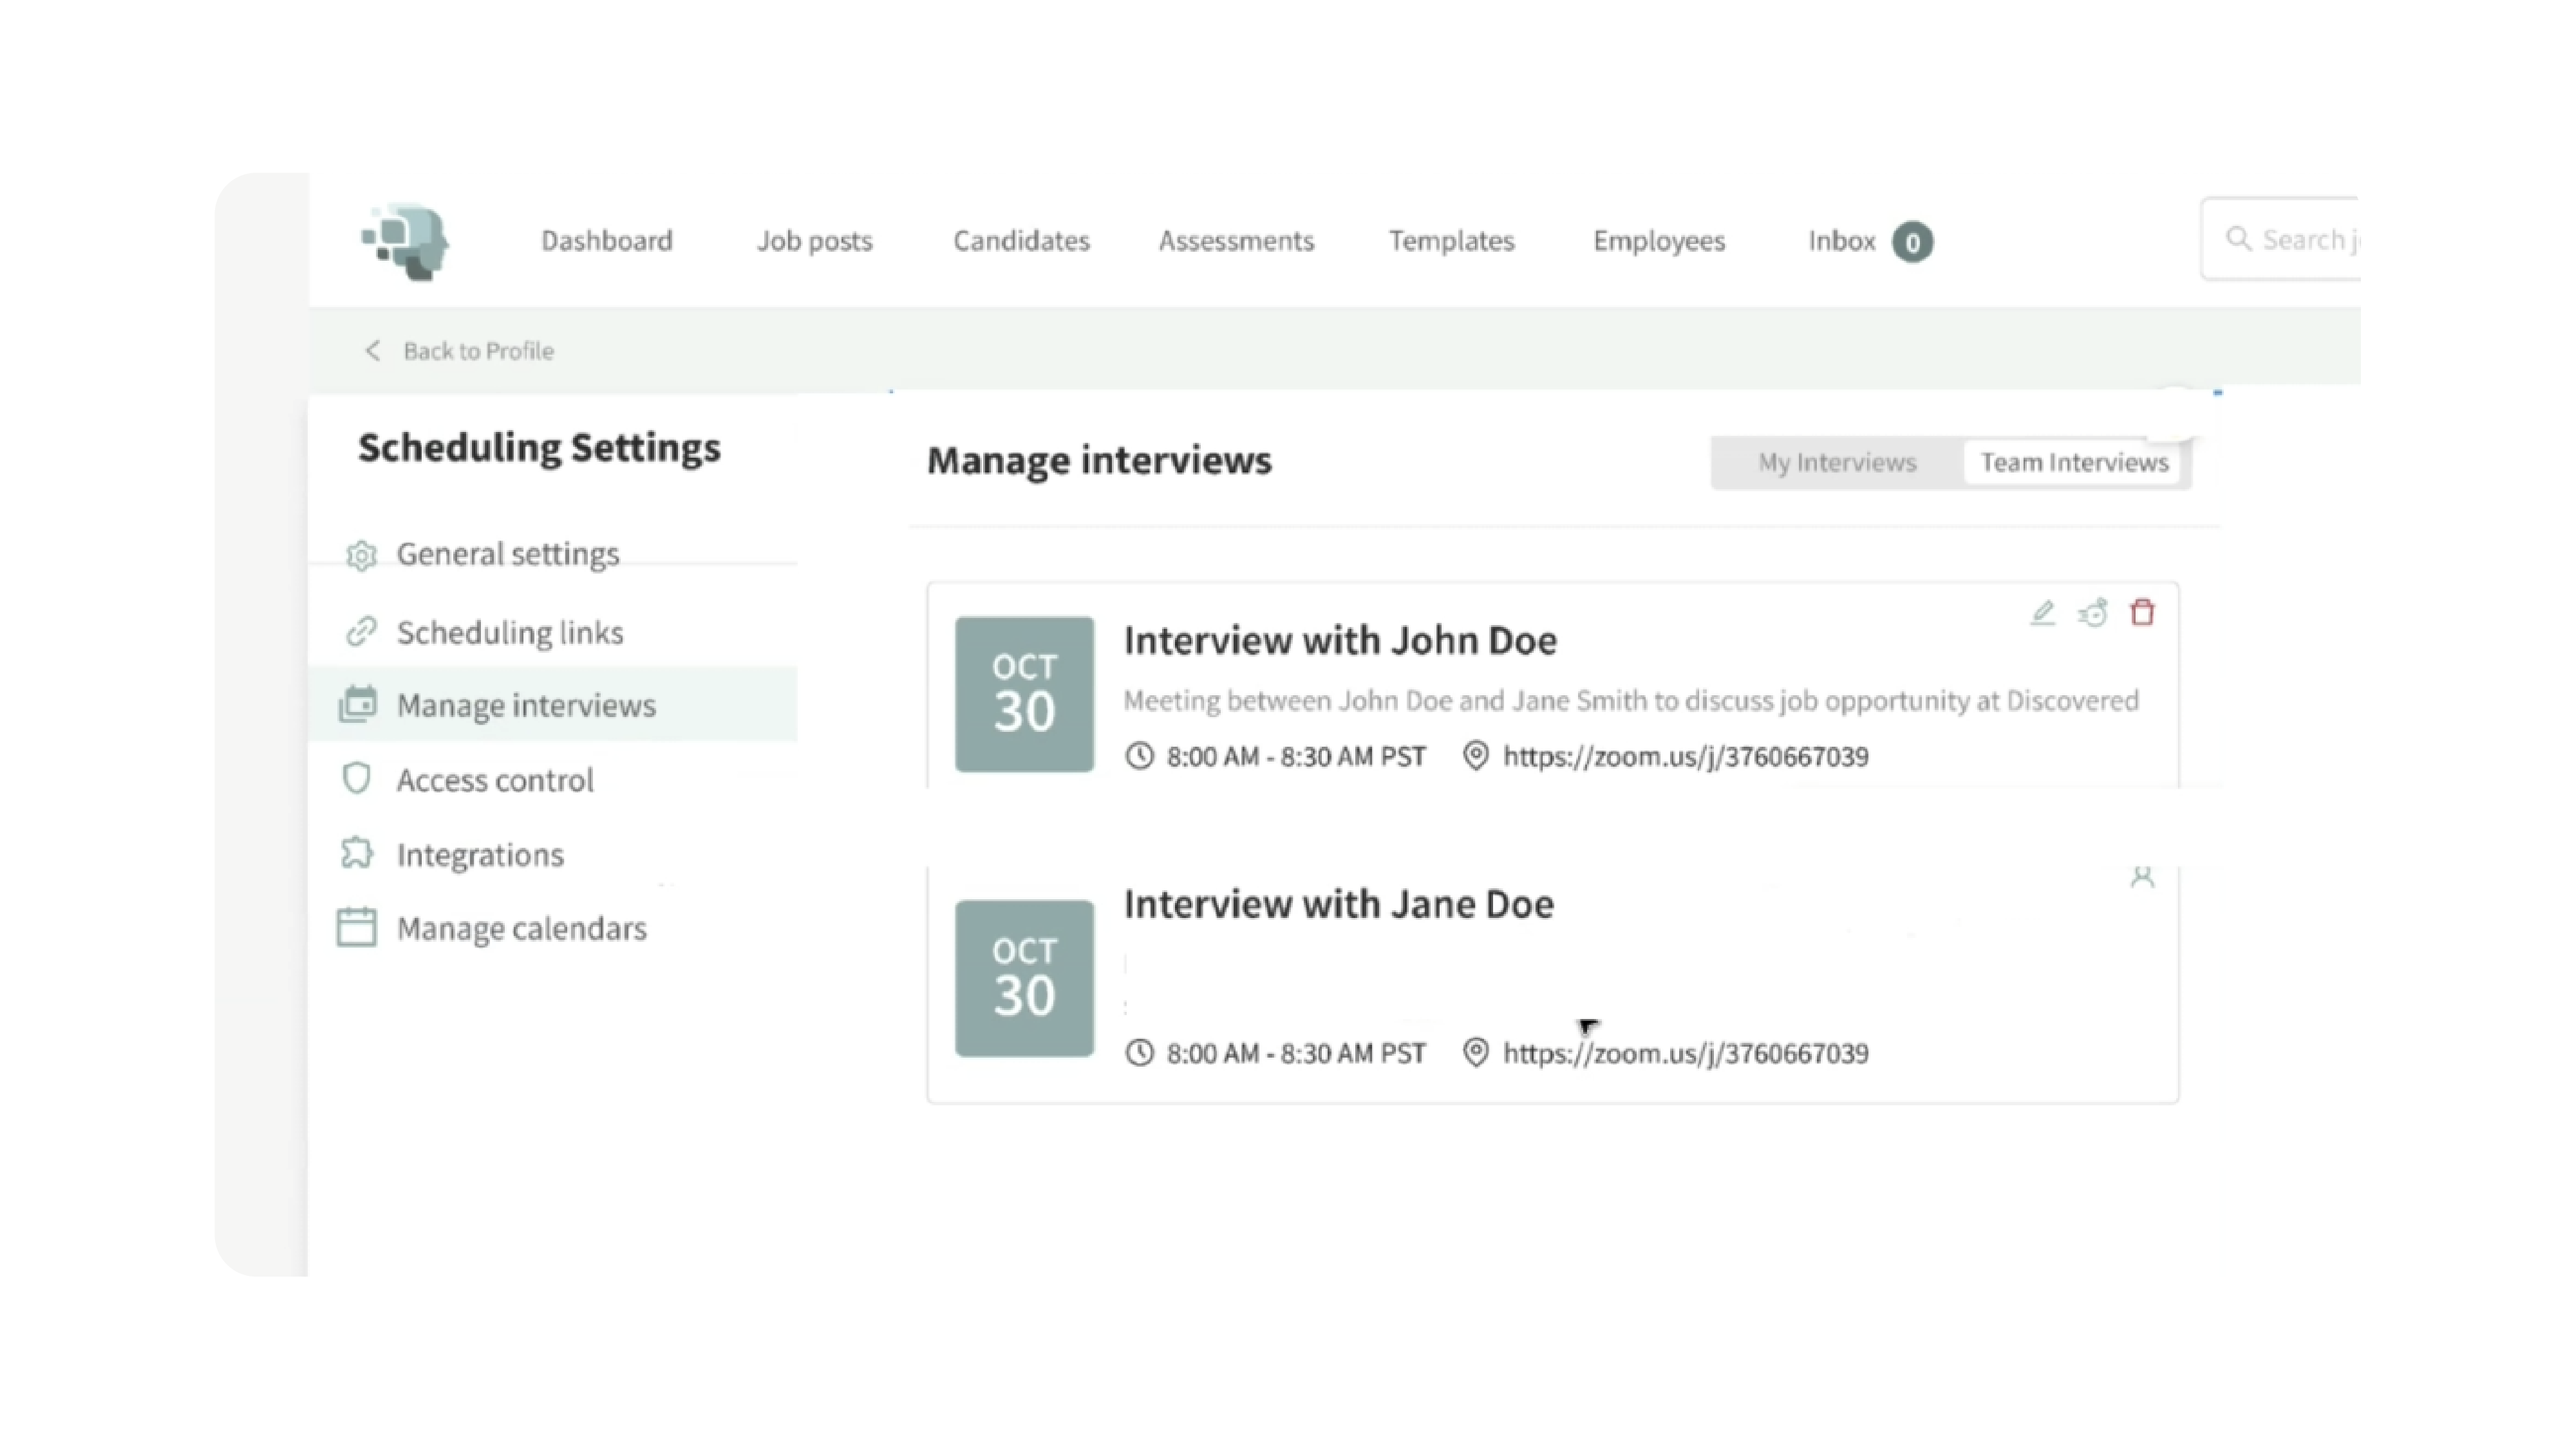
8. Manage Interviews
Inside Manage Interviews, users can:
- View upcoming interviews
- Filter personal or team interviews
- Edit interviews
- Cancel interviews
- Modify reminders
- Reschedule meetings
Team interviews allow recruiters to see interviews booked with other users assigned to the same job.
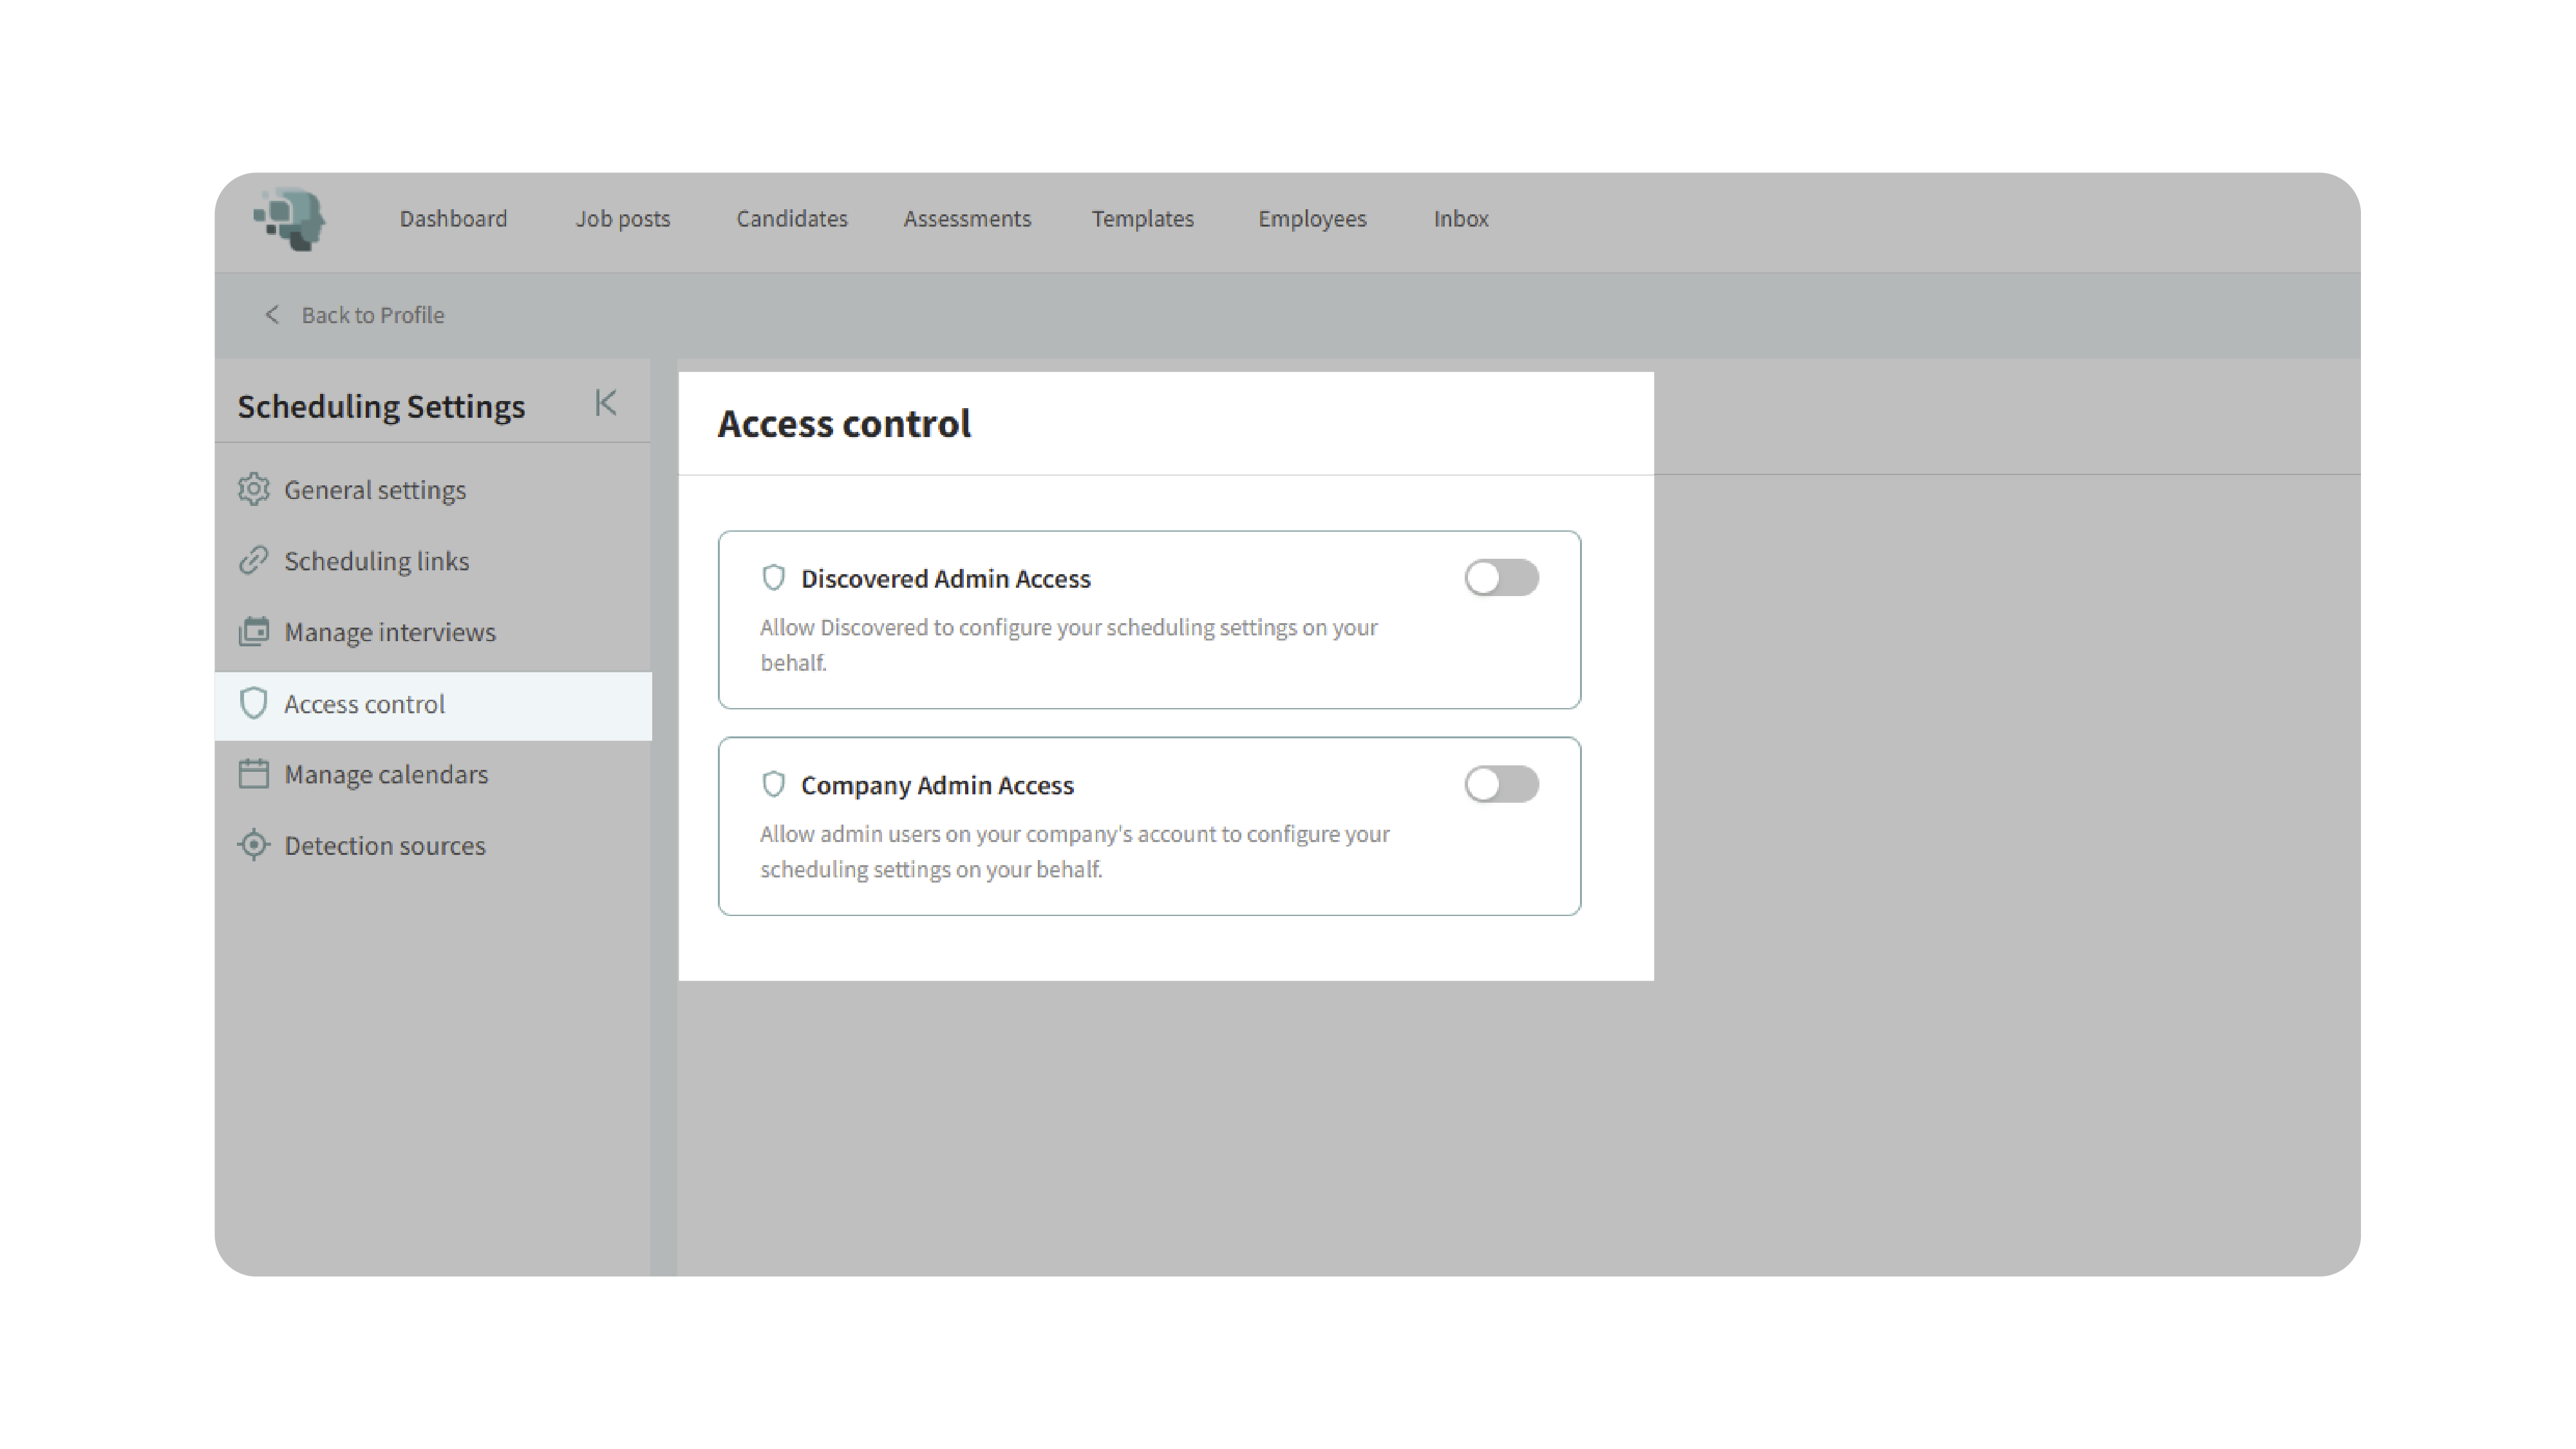
9. Access Control
Inside Access Control section, users can:
- Allow Discovered to configure your scheduling settings on your behalf.
- Allow admin users on your company's account to configure your scheduling settings on your behalf.
Use Different Scheduling Links for Different Jobs
If your company uses different calendars or interview types for different roles, you can configure multiple scheduling links and select the appropriate link in each job's Processing workflow.
For example, you may use one scheduling link for field positions and another for remote sales interviews.
1. Create or Verify Your Scheduling Links
Go to My Profile → Scheduling Settings → Scheduling Links.
Create or review each scheduling link you need. Each link can point to a different scheduling experience, including an external scheduling page.
For example:
- Cleaning Specialist → your cleaning interview calendar
- Remote Sales → your remote sales calendar
If you're using an external scheduling link, such as Google Calendar or another scheduling provider, the available appointment times and rescheduling rules are controlled by that external calendar—not by Discovered.
2. Open the Job You Want to Configure
- Go to the appropriate job posting and open the Processing tab.
- Select the status where candidates receive the invitation to schedule, such as Invitation to Schedule.
- Open the message or messaging sequence associated with that status.
3. Select the Correct Scheduling Link Token
- When editing the message, click Tokens and locate your scheduling links.
- Instead of using the generic Default Scheduling Link token, select the specific scheduling link you want candidates for that job to receive.
For example:
- Cleaning jobs → Cleaning Specialist Scheduling Link
- Remote Sales jobs → Remote Sales Scheduling Link
The scheduling link is selected within the messaging sequence for that job. This allows different jobs to use different scheduling links even when they belong to the same Discovered account.
4. Check the Default Scheduling Link
If your message uses the Default Scheduling Link token, Discovered will insert whichever scheduling link is currently configured as the account/user default.
This is important when you have multiple scheduling links.
For example, if Cleaning Specialist is your default scheduling link, a Remote Sales message that uses the Default Scheduling Link token may send the Cleaning Specialist calendar instead.
For job-specific scheduling, select the named scheduling link token instead of the default token.
5. Verify the Message Before Processing Candidates
Before moving candidates into the scheduling status:
- Open the message or sequence.
- Confirm that the correct scheduling link token is included.
- Save your changes.
- If possible, test the workflow before sending it to a larger group of candidates.
Using an External Scheduling Link
You can also paste an external scheduling URL directly into the message instead of using a scheduling link token.
This can be useful when the same external URL will always be used for that job.
However, using a named scheduling link token is generally easier to manage because you can update the saved scheduling link without manually editing every message that uses it.
When using an external scheduling provider, Discovered only sends candidates to that URL. Availability, appointment times, and rescheduling behavior are controlled by the external provider.
Using a Hiring Manager’s Scheduling Link in Messages and Sequences
If candidates need to schedule directly with a specific hiring manager, the hiring manager should first connect their calendar and create their own Scheduling Link in Discovered.
- Make sure the hiring manager has connected their calendar to Discovered.
- Go to Scheduling Settings and confirm that the hiring manager has created the Scheduling Link they want to use.
- Review the Scheduling Link settings and confirm the meeting type, availability, location, and meeting details are configured correctly.
- Open the email, sequence, or Processing status where the scheduling invitation is sent.
- Open Tokens and select the hiring manager’s specific Scheduling Link token.
- Save the message or automation.
Candidates receiving that message will be sent the selected hiring manager’s Scheduling Link.
Important: Using the Default Scheduling Link token may not send the intended hiring manager’s link. For workflows that need to route candidates to a specific person, select that person’s specific Scheduling Link token instead.
Using Calendly vs. Discovered-Generated Scheduling
The location and video meeting details depend on which scheduling provider the candidate uses to book the interview.
If you use a Discovered-generated scheduling link:
Configure the meeting location in Profile → Scheduling Settings. If you use an integrated meeting provider such as Google Meet or Microsoft Teams, Discovered can include those meeting details in the interview invitation.
If you use Calendly:
Configure the meeting location, Zoom link, or video conferencing integration directly in the corresponding Calendly event.
Discovered can send candidates to your Calendly scheduling link, but the meeting details for a Calendly booking are controlled by the Calendly event.
Before inviting candidates, we recommend completing a test booking to confirm that the expected meeting link appears in the calendar invitation.
Group Interviews (New Version Only)
The new scheduling system supports group interview scheduling where multiple candidates can book the same session.
Instead of selecting from general availability, candidates choose from predefined group interview sessions.
Features include:
- Maximum attendee limits
- Shared interview sessions
- Candidate self-scheduling
- Session rescheduling
- Candidate withdrawal options
This is ideal for:
- Hiring events
- Campus recruiting
- High-volume interviews
- Group information sessions
Scheduling Tokens & Automations (New Version Only)
Scheduling links can be inserted dynamically into:
- Email templates
- Automations
- Workflow messages
Options include:
- Sender’s default scheduling link
- Specific interview links
- Shared team scheduling links
This allows automations to personalize interview scheduling automatically depending on who sends the message.
Candidate did not receive the Zoom link
- Confirm whether the candidate booked through Calendly or a Discovered-generated scheduling link.
- If using Calendly, check the Location settings of the Calendly event.
- If using Discovered scheduling, check the Location and meeting integration in Scheduling Settings.
- Confirm the correct scheduling link token is included in the interview message.
- Complete a test booking to verify the candidate experience.
Edit Interview Reminder Messages
To review or update the reminder messages associated with a Scheduling Link:
- Go to My Profile.
- Open Scheduling Settings.
- Locate Scheduling Links.
- Open the Scheduling Link you want to update.
- Review the configured interview reminder messages.
- Edit the reminder content as needed.
- Click Save.
Reminder settings are configured separately for each Scheduling Link.
Why This Matters
Discovered’s scheduling tools reduce scheduling friction and improve candidate engagement by automating interview coordination.
This helps teams:
- Reduce manual scheduling work
- Eliminate back-and-forth emails
- Improve candidate experience
- Decrease interview no-shows
- Coordinate hiring teams more efficiently
- Scale interview scheduling across large pipelines
The new scheduling experience expands these capabilities even further with advanced automation, reminders, and team collaboration tools.
Use Cases
- Recruiters: Send scheduling links directly from workflow automations.
- Hiring Managers: Coordinate interview availability across teams.
- High-Volume Hiring: Run group interview sessions with multiple candidates.
- Distributed Teams: Use Teams, or Google Meet integrations for remote interviews.
- Recruiting Operations: Standardize scheduling workflows and reminders across hiring teams.
Best Practices
- Connect your calendar before configuring scheduling links
- Verify your time zone settings carefully
- Test scheduling links before sending them to candidates
- Use separate scheduling links for different interview types
- Configure reminders to reduce candidate no-shows
- For group interviews, clearly define attendee limits and session times
- Use scheduling tokens in automations for scalable workflows
What Happens Next
Once scheduling is configured:
- Candidates can self-schedule interviews
- Meetings sync automatically with your calendar
- Interview reminders send automatically
- Scheduling activity appears inside candidate profiles
- Hiring teams can coordinate interviews more efficiently
For users on the new scheduling system:
- Multiple scheduling links become available
- Group interview management is enabled
- Team interview visibility improves collaboration
- Automated reminders and integrations streamline scheduling even further
With Discovered Scheduling Settings, your hiring team can automate interview coordination, improve candidate experience, and scale recruiting operations more efficiently — whether you’re using the classic or redesigned scheduling system.